Were you all buckled up to start your day’s work when the system’s screen responded with a “personalized settings (not responding)” error and got stuck there? Personalization is one of the coolest features offered by Windows. From the background and accents to fonts and themes, it does everything to enhance your computing experience. However, sometimes, Windows Explorer handling these personalizations can cause problems leading to the Windows 10 personalized settings not responding error.
The error will appear on a black screen with seemingly no way to escape it. Thankfully, there are ways to combat this issue and bring your computer back to its prime.
However, why is Windows Explorer causing this error, and what does it even mean? If your mind is stuck on these questions, read on further to find the answers.

What Is the “Personalized Settings Not Responding” Error?
Windows Explorer is the one application of Windows responsible for handling all personalization details. Whenever you change background, font, or colors, you’ll go through Windows Explorer.
But sometimes, when you start the computer, Windows Explorer fails to load correctly. In this situation, the faulty desktop won’t load, leading to the Windows personalized settings not responding error.
The error implies that personalized settings, i.e., Windows Explorer, is not responding.
What Causes the “Personalized Settings Not Responding”?
Since its inception, Windows has come a long way. From the boxy Windows XP to the sleek Windows 11, the changes have been quite noticeable. But despite this progress, there are certain areas in which Windows still lacks that require the user’s fixing.
One such shortcoming is “personalized settings not responding.” It occurs because of:
- Update Problems: Updates are one of the most common reasons for the error. Application or software updates can carry bugs that interfere with the system and cause system crashes or slowdowns. An operating system update can be the root cause behind “personalized settings not responding.”
- Corrupted Files: Corrupted files can also disrupt while booting up. Discrepancies in boot-up timing between Windows Explorer and these files can lead to such errors.
- Driver: Malfunctioning and outdated drivers are also one such cause.
How to Fix Personalized Settings Not Responding
The “personalized settings not responding.” error can have dire consequences for the ability of the Windows system. It stops you from accessing files and folders that might be extremely important for your school or work. Hence, getting the system in its working condition is integral.
The best and most effective methods are:
- Switching the Network Connection State
- Restarting File Explorer
- Deleting a Registry Key
- Using System Restore Point
- Updating Graphics Driver
- Running SFC Command
- Uninstalling Windows Updates
- Restarting the Computer
- Disconnecting Your Devices
Method 1 – Switch The Network Connection State
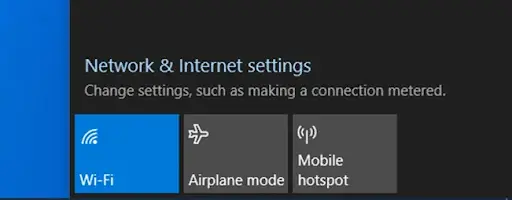
You might be aware of two network modes on your phone – airplane mode and cellular board. Similar is the case with computers as well. Generally, while the computer works, you can switch between the two from the panel in the bottom right corner. However, since it is not in the state of opening, you can toggle between the two by:
- Pressing Ctrl+Alt+Del together to enter Windows Security.
- Finding the desktop symbol from the bottom right panel.
- Turning on the Airplane Mode; this will help change the network state.

- Finally, sign out of this session (the option is at the center of the screen).
- Restart and log back in to check whether the desktop is functioning.
Method 2 – Restart File Explorer
We know that it is Windows Explorer that causes the system to freeze or stop altogether. It conjures a black screen when it fails to boot up. However, it can be easily redeemed by restarting the explorer manually. Here’s how:
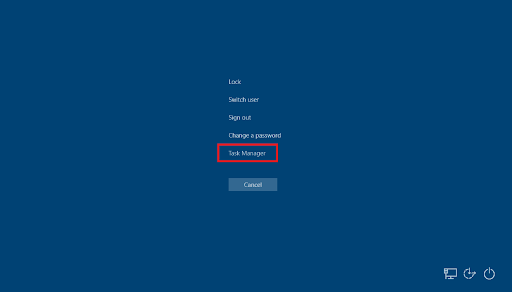
- Enter the Security Screen by pressing Ctrl+Alt+Del.
- Choose Task Manager from the center menu. The manager will open up.
- Go to the Processes tab and find Windows Explorer.
- Right-click on it and select Restart from the menu that appears.
Note: If the task manager loads up in Preview mode, go to details at the bottom left corner. It’ll give access to Processes.
Method 3 – Delete a Registry Key
Through the Windows Registry Editor (regedit), one can make changes to the operating system’s registry. Removing a specific key from this registry can eradicate the “personalized settings not responding” error.
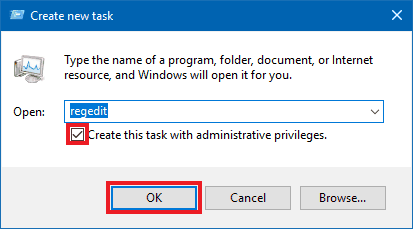
- Open Windows Security by tapping Ctrl+Alt+Delete together.
- Select Task Manager from the list.
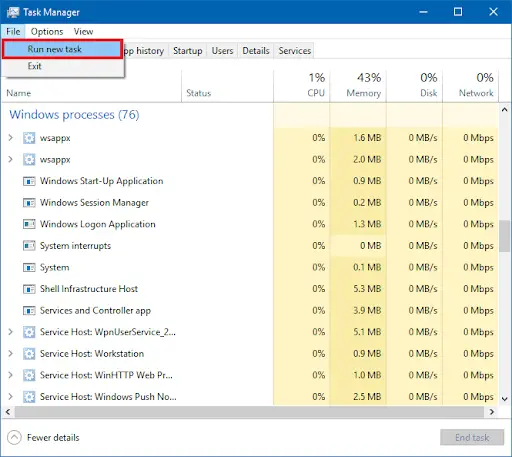
- From the top left corner, select Files and Run New Task; a pop-up window will appear.
- Type regedit, tick Create this task with administrative privileges, and select OK.
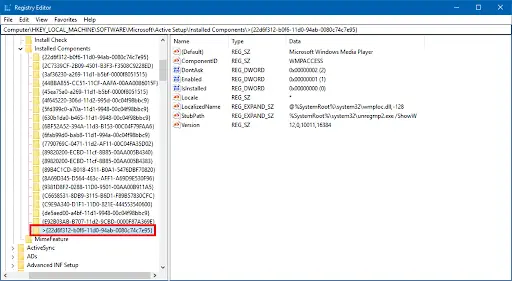
- The Windows Registry will open. From the left panel, navigate to HKEY_LOCAL_MACHINE – SOFTWARE – Microsoft – Active Setup and Installed Components.
- Under Installed Components, find the >{22d6f312-b0f6-11d0-94ab-0080c74c7e95} key (could be different for your system, so find the last key of Installed Components).
- Next, right-click on the key and select Delete from the menu.
- Select Yes from the new pop-up window that appears.
- Restart your system by going to Windows Security again.
Method 4 – Use System Restore Point
https://www.youtube.com/watch?v=v5Y72uQJJcg
Windows offers an excellent solution for situations like this. It allows you to make a backup of your essential files, folder, and settings. The backup will happen manually or automatically. It’ll help bring your computer to its normal state.
After the error occurs, simply plug in your external devices like a bootable USB drive or Windows DVD. These external systems are necessary because you cannot access these options from the system itself.
Method 5 – Update Graphics Driver
An outdated and old graphics driver can also cause the error to surface. You can respond to this problem by updating the drivers.
Here’s how:
- Press Win+X together from the keyboard.
- Select Drive Manager from the drop-down menu.
- Next, right-click on the driver.
- Choose Update Driver.
- A new pop-up window will open, and choose Search Automatically for the Updated Driver Software.
- Your computer will start an automatic search and will install them.
Method 6 – Run SFC Command
SFC commands can be efficiently run through the Start menu or search bar, but since they’ll be unavailable to you, they can be found through Task Manager. This is how you should do it:
- Open Windows Security by pressing Ctrl+Alt+Delete together. Find Task Manager and open it.
- From the top left corner, pick File and then select Run new task.
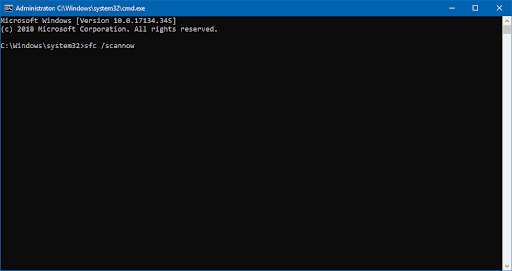
- A new window will open—type cmd.
- From the Command Prompt that opens and type command sfc /scannow.
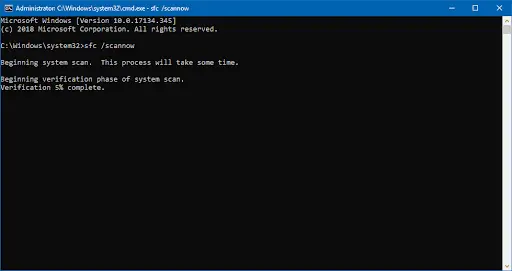
- Press Enter.
- The scan will automatically begin and fix the corrupted files.
- Wait for the process and restart the computer from the Windows Security screen (press Ctrl+Alt+Delete to open it).
Method 7 – Uninstall Windows Updates
Windows updates are also a common reason behind the Task Manager’s failure. If you’ve recently installed any downloads, you can uninstall them by going to Windows Registry, where they’re stored.
Follow the steps to precision. Otherwise, you’ll end up deleting the wrong files and causing more errors. The steps are:
- Press Ctrl+Alt+Delete to open Windows Security.
- Open Task Manager.
- Find Files in the top left corner and select Run new task.
- Type regedit on the window, check to Create this task with administrative privileges, and press OK.
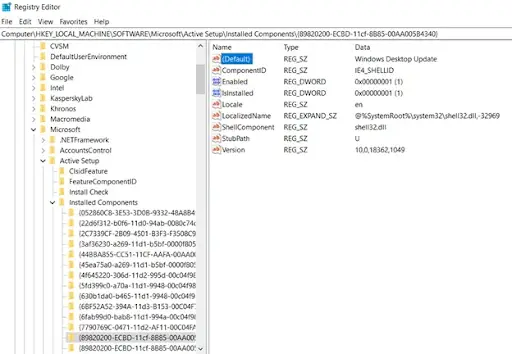
- On the Registry Editor, go to HKEY_LOCAL_MACHINE – SOFTWARE – Microsoft – Active Setup – Installed Components. You can either manually search for it or enter the path on the search bar.
- Under Installed Components find {89820200-ECBD-11cf-8B85-00AA005B4340}.
- From the right panel, find Default with Data as Windows Desktop Update.
- Right-click on it and select Delete. Click Yes when prompted.

Method 8 – Restart The Computer
You should resort to a simple restart when none of these methods work. The underlying problem might be a minor, temporary glitch or a bug that will be destroyed after restarting. It’ll also restore the system to the default settings and load back to your desktop.
To restart the computer from the blank screen:
- Open the Windows Security by pressing Ctrl+Alt+Del.
- Find the Power button from the bottom right corner.
- From the list of available options, choose Restart.
Note- Do not directly switch off the system from the power outlet or laptop’s power button. While it may allow you to boot up again, it harms the computer’s hardware.
Method 9 – Disconnect Your Devices
Sometimes the external hardware system messes with the software and causes issues. It can be anything from the pen drive or CD to your mouse, keyboard, or speakers. So shut down your computer, detach these devices and start the system back up. If it boots up successfully, then the problem was with the device.
Try to attach them one by one and find the one causing the problem. It might be a one-time issue. However, if the problem persists, consider replacing it.
Conclusion
That’s all! These nine effective methods to combat the “personalized settings not responding” error will work like a charm. You can go back to personalizing your system with your favorite background, color, and font.
Just remember that following these steps to the T is highly crucial. In the Registry, you might lose some system components if you end up deleting some important files. So, check and verify before deleting anything.
We hope the article proved helpful to you. Let us know which method did the job!