Facing a blue screen with an error flashing atop is never a good feeling, more so when the Blue Screen of Death (BSoD) forces you to restart the system repeatedly with seemingly no way out of it. The clock watchdog timeout is one such error that dooms your computer from starting and displaying the contents.
But as annoying as this cryptic error is, its solutions are pretty easy to understand and implement. Read on to find the underlying cause and methods to overcome the clock watchdog timeout overclock error.
What Causes the “Clock Watchdog Timeout” BSOD Error?
The stop code clock watchdog timeout error indicates something is wrong or amiss with your system hardware, the OS, or its processing.

Clock Watchdog Timeout – Windows 10 11 Best Solutions
Whenever you give any command to the CPU, it interrupts or interferes with the process and indicates what you require. This is an entirely standard procedure called “system interrupt”. However, sometimes, this interruption stage, also known as interrupt request level (IRQL), is sustained for a long time without any response.
This leads to the processor failing to carry out any further tasks and lacking space for receiving responses. The vegetative state, called a deadlock, leads to the BSOD clock watchdog timeout error.
Some Related Clock Watchdog Timeout Error
The clock watchdog timeout is not the only error produced due to the deadlock. There are several variants, including:
- CLOCK_WATCHDOG_TIMEOUT Error Ryzen – You can encounter this error if a Ryzen processor powers your computer. Roll back on the updates that cause this error.
- CLOCK_WATCHDOG_TIMEOUT Error HP, Lenovo, Intel, AMD- Any problem in the processor of the computer’s system can lead to this error.
Clock Watchdog Timeout Windows Version – Sometimes, the system files get corrupted or damaged, leading to the error. The best way to solve this is by running a thorough system scan.
- Clock Watchdog Timeout Overclock – Manually overclocking the CPU by making too many requests can cause the error. By changing the system configurations, you can get rid of it.
- Clock Watchdog Timeout GPU And CPU Memory – If you’ve attached any incompatible hardware to the computer, it’ll cause system failure, and thus this error.
How to Fix Clock Watchdog Timeout?
The best ways to solve stop code clock_watchdog_timeout are:
- Update Your Drivers
- Update Your BIOS
- Disable C1E and Intel SpeedStep in BIOS
- Remove Problematic Applications
- Reset BIOS
- Remove the Overclocking Settings
- Update Your SSD Firmware and Disable LPM
- Run The System File Checker (SFC)
- Install the latest Windows Update
- Unplug Your DVD Drive During Windows 10 Installation
- Use The Windows Memory Diagnostics Tool (Memtest)
- Troubleshoot in Clean Boot State
- Run Windows Troubleshooter
Method 1 – Update Your Drivers
Drivers are responsible for looking after the efficiency of the computers and their linkages with the operating system. They’re one of the biggest reasons behind any bluescreen errors. Outdated or corrupt drivers are often responsible for slowing down the system, causing a delay in processor responses and hence the errors.
One needs to update the drivers with the latest version if one wants to rid themselves of the blue screen clock watchdog timeout. While the latest versions, Windows 10 and 11, have automatic driver updates, it is best to check for any updates that might’ve slipped through.

To manually update the driver, go to the Device Manager (through Start Menu or Win+R) and find yellow error indicators. If you don’t see any, then it is likely that the error does not originate from a faulty driver. However, if there are any, then select update the driver.
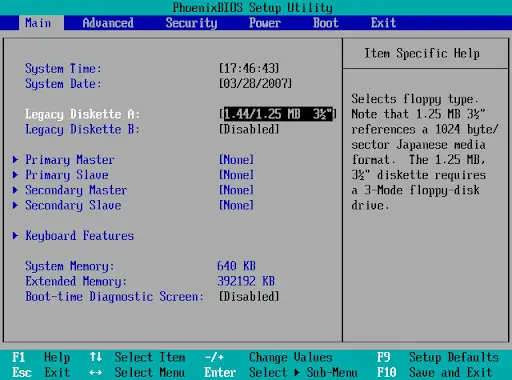
Method 2 – Update Your BIOS
Outdated BIOS can also be the culprit behind the error. In fact, it is one of the leading causes, and almost half of the users can expect their problems to get solved right here. To update the BIOS, go to your manufacturer’s website, and find and download the latest update.
Install it on your system by navigating to your Downloads, right-clicking on the file, and running it as an administrator. If the downloaded file is ZIP, extract it on an external drive and install it on the BIOS menu interface.
Your problem should probably be solved. If not, then try other methods.
Note: BIOS is an extremely important part of your computer system; any mishaps during installation can ruin the system. So, be careful while following the instructions.
Method 3 – Disable C1E and Intel SpeedStep in BIOS
One can also solve this error by simply disabling some settings in BIOS. One setting that reportedly solves the issue instantly is C1-6. To perform the task, you must first understand how to access BIOS. You can find the answers in your motherboard manual.
Once you know the path to access it, go to the processor settings and disable C1-6. On the same settings, you’ll find Intel SpeedStep. It can also be the cause of clock watchdog timeout error. So, if you see it enabled, disable it to remove the error hopefully.
Method 4 – Remove Problematic Applications
Whenever you download any games or apps from a shady website, your computer runs the risk of getting corrupted. You can manually go through each app and find the one that might be causing the issue.
Even regular software like antivirus can be behind it. It interferes with the routine working of the OS and significantly slows down the process. While removing your antivirus, remove any adjoining files or registries that the software might have created.
Users have reported that sometimes the Asus AI Suite leads to the error. So, it is advised to remove it as well.
If it indeed was your antivirus software behind the clock watchdog timeout error, then consider shifting to other reliable ones. There are several available on the market but be sure to check whether they tend to cause conflict with the system.
Method 5 – Reset BIOS
Some mishaps in the BIOS settings can also be instigating the error. Default BIOS and configuration settings work pretty well with the default settings, and it is better to keep them intact. If by chance you’ve made a mistake, then reset the BIOS settings by:
- Boot up your system but stop it midway by pressing Delete, F10, or F12 together. This will launch the BIOS menu.
- 2.On the BIOS menu window, press F2 to open the settings menu.

- Under the menu, you can find the option to restore default settings.
- Once resetting is completed, press F10 and then Yes to confirm the acceptance of the changed configurations.
- The system will reboot, and the changed settings will apply.
Method 6 – Remove the Overclocking Settings
Overclocking is a unique feature of the CPU that allows it to increase or decrease its clocking time. The clocking time here refers to the time the CPU typically takes to finish a process.
Sometimes, however, the CPU overclocks, which puts strain on the computer system leading to heating or hardware failure. Overclocking is best avoided as it also harms the computer system.

To overcome the problem, go to the BIOS settings and then CPU configuration. On the CPU configuration, you can find the overclock option. Ramp up its frequency to solve the issue.
Method 7 – Update Your SSD Firmware and Disable LPM
Your outdated SSD firmware can also be behind the clock watchdog timeout error. But updating the firmware can be pretty hard, and any miscalculated move while updating can render your system useless. So, be careful and take precautions by backing your files up.
To update your SSD firmware:
- Navigate to your SSD company’s website and find any new firmware updates.
- Go through the update and tap on Update when you’re sure.
Once the update is installed, the error should probably go. You can also try disabling LPM. Watch the following video to understand the process:
https://www.youtube.com/watch?v=nH9Fnes2tYw
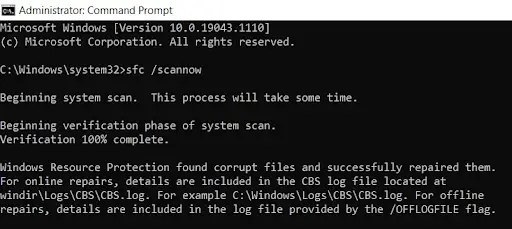
Method 8 – Run The System File Checker (SFC)
System File Checker is a feature of Windows that helps detect any corrupt file and get rid of it. In its place, the feature inserts the updated version of that particular file. To run the check through SFC:
- Open the Command Prompt by either typing “command prompt” in the Run utility (Win+R) or manually searching from the Start menu.
- Whichever method you choose, be sure to select Run as administrator.
- Once the prompt opens, type the command sfc /scannow.
- Press Enter.
- It’ll start the scan and automatically replace any corrupted files. For changes to reflect, restart the computer.
Method 9 – Install the latest Windows Update
To remove any bugs and add improvements, Windows regularly rolls out updates. These security updates are vital to keep your computer in its prime state and ensure that it is safe from any bugs. If you’ve missed out on any latest updates, then it might be causing the error.
To manually update the Windows operating system:
- Press Win+I together to launch Settings.
- Enter Windows and security and find Check for updates.
- Click on it to start looking for any pending updates.
- If it finds any, the update and installation process will start automatically.
Method 10 – Unplug Your DVD Drive During Windows 10 Installation
The clock watchdog timeout error isn’t just a minor nuisance that can obstruct some functions. Users have complained that it even stops the installation of Windows 11 in their system.
If you do not want to miss out on the latest Windows operating system, try removing the SATA DVD drive. After the removal, the error should be gone, and you can smoothly install the update.
However, if your DVD drive is not working or is amiss, you can solve the issue by watching the following video:
https://www.youtube.com/watch?v=-xazGDmFE0o
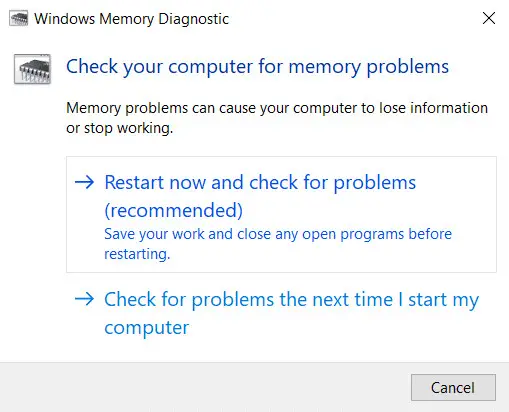
Method 11 – Use The Windows Memory Diagnostics Tool (Memtest)
Memtest or Memory Diagnostics Tool is another helpful feature of Windows that helps detect problems in your computer’s memory. If you want to run the tool on the computer, then follow the given steps:
- Open the Run utility by pressing WIn+R together or searching it manually from the Start menu.
- On the text box of the Run window, type Mdsched and press Enter. This command will open the tool.
- From the pop-up window that appears, select Restart now and check for problems (Recommended). As the option suggests, save any unsaved files and close any open windows.
- The tool will search for the underlying problems and get rid of them. By the time your system starts, the error should’ve disappeared.
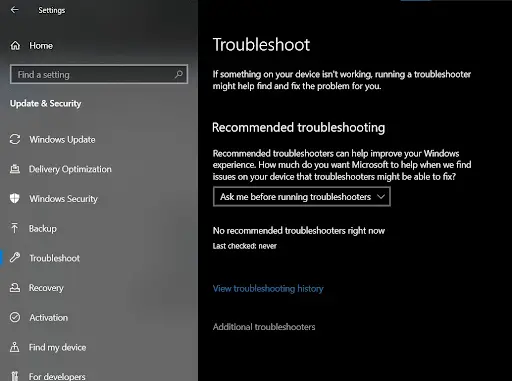
Method 12 – Run Windows Troubleshooter
Seeing how common BSoD errors are, Windows has devised an exclusive troubleshooter for its OS 10 and 11. It’ll deal with the error by detecting its root, removing it, and preventing any future occurrences.
The steps to run a Windows troubleshooter are:
- Open the Settings app by pressing Win+I or searching manually from the Start menu.
- Enter Updates and security.
- Find Troubleshoot from the left side panel and open it.
- After clicking, the list of available troubleshooters will show up on the right side.
- If you don’t see them outright, tap on Additional troubleshooters, present at the bottom of the menu.
- That link will redirect you to the Blue Screen option. Expand it and select Run the Troubleshooter.
- Follow the instructions as directed by the troubleshooter until it starts running successfully.
After completion, the troubleshooter will detect and remove the BSoD issue. You’ll have to restart the system for the effects to reflect on your operating system.
Method 13 – Troubleshoot in Clean Boot State
If the Windows troubleshooter does not work, try using the clean boot process. The process will help segregate the problems and pinpoint their exact location. You can then get rid of them.
You can use the feature by:
- Bring up the Run utility through Win+R.
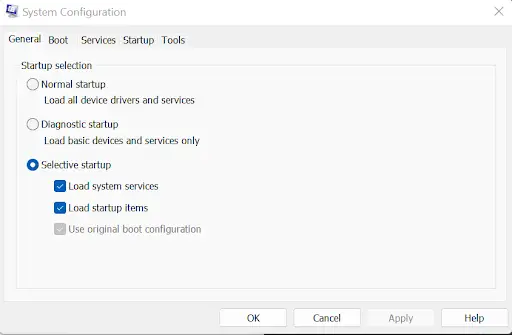
- Execute command MSConfig and select the OK button. This will launch System Configuration.
- From the options above, navigate to General; listed options appear.
- Select the Selective Startup button
- Uncheck Load startup items.
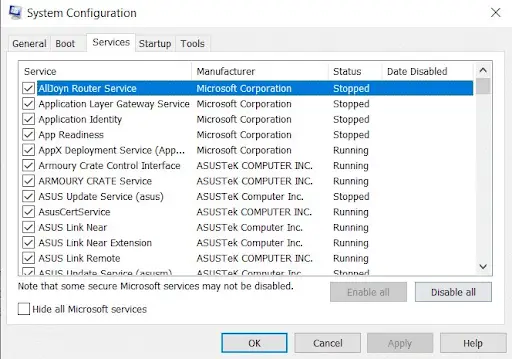
- Now navigate to the Services option.
- You’ll find Hide all Microsoft services at the bottom; check it.
- Now select Disable all. This will disable all services when the system starts.
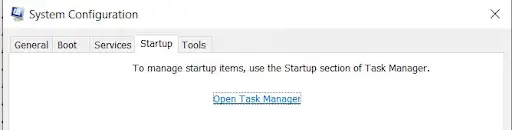
- Next, go to the Startup option and click on Open Task Manager. It will open Startup in Task Manager.
- 10.A list of all enabled services will appear. Disable them all.
- 11.Restart your computer for the changes to take place.
Since you’ve disabled all the unnecessary services, your system will boot up with minimal interruption.
Conclusion
BSoD errors like clock watchdog timeout are quite common, and it is best to have its solutions handy! Our methods are pretty effective and easy, and you’ll have no problem executing them whenever necessary. However, be cautious while making any changes to the core workings of the system as it may considerably affect it.
Let us know which method worked the best for you!

