Your computer stores huge volumes of data on its hard drive. This hard drive, in turn, makes use of different configurations to store and organize all that data. The two most common data storage configurations are – basic disk and dynamic disk.
While the dynamic disk was first introduced in Windows 2000, the basic disk is from the initial days of DOS and it continues to dominate the former for good reasons.
If you have a dynamic disk in your Windows 10/11 and want to know how to convert dynamic disk to basic, I have got you covered. This article covers everything regarding the disks and the top 3 ways to convert a dynamic disk to a basic. So, let us start.
Basic v/s Dynamic Disk
Let us first understand what a basic and dynamic disk is.
Basic Disk:
First made available with MS-DOS, the basic disk is the most common hard drive configuration to store data. Any disk installed on Windows OS is basic by default. What makes it different from the dynamic disk is the use of partition tables or logical drives to manage partitions on the hard drive.
A basic disk can contain up to three or four primary partitions. Besides, an extended partition is also present in a basic disk which can be further divided into multiple logical drives.
The basic disk serves the following purposes.
- Format a partition and mark it active
- Create or delete primary or extended partitions
Dynamic Disk:
A dynamic disk, on the other hand, is a hard drive configuration first introduced with Windows 2000 and is the opposite of the basic disk. Instead of partition tables or logical drives, the dynamic disk makes use of a logical disk manager (LDM) to store or manage data.
Whenever a dynamic disk is changed, the information is recorded in the LDM and hidden at the end of the disk.
Another great advantage of a dynamic disk is its fine performance and flexibility in storing data in 5 different volumes – simple, spanned, striped, mirrored, and RAID-5.
Here is a quick look at each of these volumes.
- Simple volume: It is similar to the basic volume and has no initial limitation on size or quantity. It does not support fault tolerance and I/O.
- Spanned volume: The spanned volume in a dynamic disk is created from unallocated spaces on the disk and extended similarly. Like the simple volume, spanned volume does not support fault tolerance, I/O, and mirroring.
- Striped volume: The striped volume is the same as spanned volume. The only difference between the spanned and striped volumes is support for I/O in the latter.
- Mirrored volume: The mirrored volume does not support I/O but fault tolerance. You can create only 2 disks simultaneously. Further, no disk gets influenced by the other.
- RAID-5 volume: It is the redundant array of unrelated disks that use disk striping with parity.
A dynamic disk performs the following operations.
- Reactivate an offline or missing disk
- Expand a spanned or simple volume
- Repair RAID-5 or mirrored volume
What Is The Difference Between Dynamic Disk And Basic Disk?
Here is the summary of dynamic and basic disks in a tabular format.
| Basic Disk | Dynamic Disk |
| It is the basic hard drive configuration associated with MS-DOS. | It was first introduced with Windows 2000. |
| The basic disk is based on the concept of partition tables or logical drives. | A dynamic disk is based on the concept of volumes of data. |
| It can contain up to 4 primary partitions or 3 primary partitions plus 1 extended partition. | In a dynamic disk, there are no partitions but volumes. |
| The two most common partition styles are – MBR partition (3 primary partitions + 1 extended partition or 4 primary partitions) and GPT partition (128 partitions). | There are 5 volume segments in a dynamic disk. These are mirrored, spanned, simple, RAID-5, and striped. |
| You can easily convert a basic disk to a dynamic disk without losing your data. | You can convert a dynamic disk to basic. However, you would first need to delete all volumes. |
| It supports multi-boot configuration. | It does not support a multi-boot configuration. |
So, these are the main differences between a basic and dynamic disk.
Can We Convert A Dynamic Disk To Basic Disk?
One interesting fact is that the Windows Home edition does not support dynamic disks. As a result, accessing internal or external hard disk drives that have converted into dynamic disks is not possible.
You, however, can convert the dynamic disk to the basic if there are no partitions on it. To begin with the conversion process, you should first delete volumes of data on the disk.
Then, you can use any of the available third-party disk conversion tools or the built-in Windows disk management tool.
How To Prevent Loss Of Data?
As aforementioned, you can lose your data while converting the dynamic disk to basic. However, if you restore your valuable data from the dynamic disk before converting, you can avoid losing your data.
What Happens When I Convert To A Dynamic Disk?
It is common to think about what happens when you convert to a dynamic disk since there are certain things you should be aware of. These include:
- You can not revert to the basic disk unless you delete the dynamic volumes
- Not all basic disks are convertible. These include removable media such as ZIP & Jaz disks
- Disk conversion is not a quick fix and may not yield the desired results after conversion
- Furthermore, you can not convert a basic disk to dynamic if the former is present on your laptop
Above all, if you work towards converting your basic disk to dynamic, you would experience a better OS performance than before.
This is because there are no partition tables or logical servers in dynamic disks. It uses LDM or VDS to track the stored data. Hence, it is up to you whether you want to use the basic disk or dynamic disk.
If you are using a dynamic disk and want to convert to basic, read further.
How To Convert A Dynamic Disk To Basic?
Though it is a fact that a dynamic disk improves the performance of your Windows OS, there are some instances when you should avoid using or converting to a dynamic disk. These include:
- Your OS does not support dynamic disks
- You are downgrading your Windows OS
- There are some unknown partitions
If you fall into any of these situations, you should avoid using a dynamic disk. I recommend the following three ways to change the dynamic disk to basic.
Note: I suggest backing up all data before beginning the conversion process to avoid any data loss.
1. Change A Dynamic Disk Back To A Basic Disk By Using Built-In Disk Management Tool
The Windows built-in disk management tool is an ideal solution to your how to convert a dynamic disk to a basic disk problem.
Follow these steps to use the disk management tool to convert the dynamic disk to basic.
- Open the Search box on your Windows and enter Computer Management in it.
- Select the top option on the list and right-click on it. Click on the Run as administrator option from the dialog box that appears. Click on Yes on the next screen.
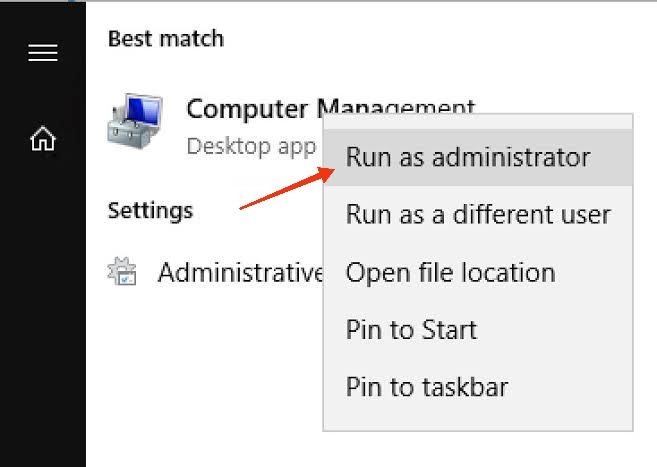
Run as administrator
- The Computer Management window will load. Once it opens up, click on Storage on the left panel and then select Disk Management.
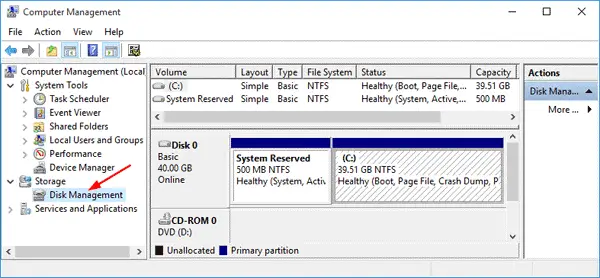
Disk Management
- The Disk Management window will open up. You will see multiple volumes with their other information such as layout, type, capacity, etc. Right-click on each or desired volume and select the Delete Volume
- This will delete the volumes from the disk.
- To convert the dynamic disk to basic, right-click on the disk and select the Convert to Basic disk
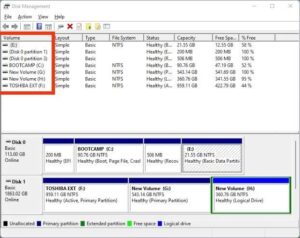
Convert to Basic disk
You have successfully converted the dynamic disk to basic using the disk management tool.
2. Change A Dynamic Disk Back To A Basic Disk By Using A Command Line
The next method to change a dynamic disk back to a basic disk is through the Command Prompt. To do so, follow these steps.
- Open the Search box of your Windows and enter Command Prompt in it.
- Select the top option, right-click on it, and select Run as administrator.
- As the command prompt opens up, type the diskpart command in the input field. Hit the Enter This will take you to the diskpart console.
- As the diskpart console is open, type list disk to get the entire list of dynamic disks on your system. Make sure to note down the disk number you wish to convert to basic before heading to the next step.
- Now, while you are still in the diskpart console, type select disk <disk_number>. For example, select disk 0. Press Enter.
- Again, type detail disk <disk_number> in the diskpart console. For example, detail disk 0. Press Enter.
- For the volume of each disk, type select volume= <volume_number>. For example, select volume= 0. Hit Enter.
- Next, type delete volume and press Enter to delete the volume.
With the volume deleted, you can now convert the dynamic disk to basic. For this, continue with these steps.
- In the diskpart console, type select disk <disk_number>. For example, select disk 0. Press Enter.
- On the next prompt, type convert basic and hit the Enter
- Type exit to end the process.
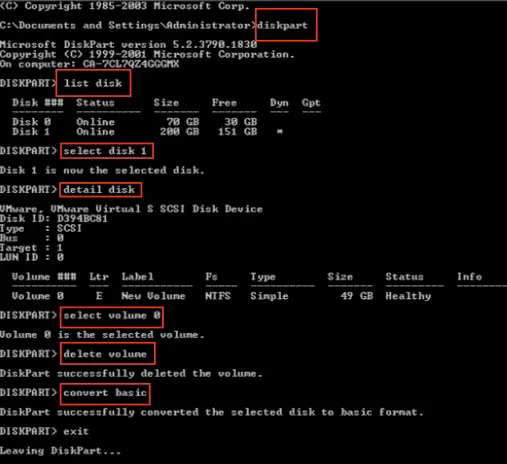
type convert basic and hit the Enter button
Repeat the above steps for the other disks and volumes. Make sure to delete all volumes on the dynamic disks before converting them to basic.
3. Change A Dynamic Disk Back To A Basic Disk By Using Third-Party Tools
Apart from the disk management tool and command prompt, there are also third-party tools that let you convert dynamic disk to basic disk.
One such third-party tool is MiniTool Partition Wizard. It is an easy-to-use and free partition management tool for Windows developed by MiniTool Solutions.
Follow these steps to use the tool.
- Install the tool from its official website and launch it.
- You will see the available dynamic disks on your system on the tool’s home page.
- Click on the Convert Dynamic Disk to Basic option on the left side panel. Alternatively, you can right-click on the dynamic disk and select Convert Dynamic Disk to Basic from the pop-up menu that appears.
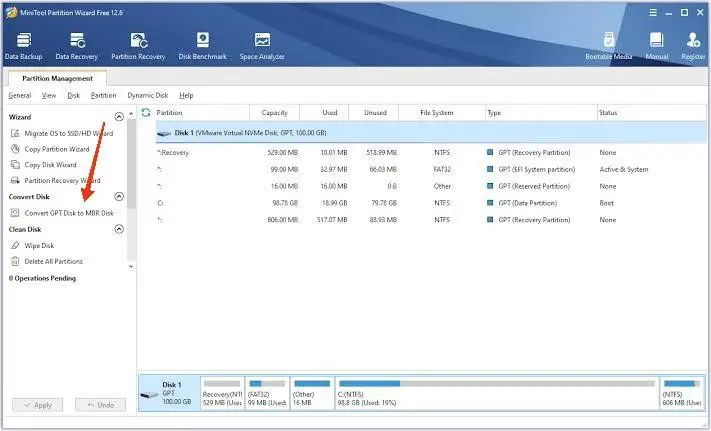
Convert Dynamic Disk to Basic
- The dynamic disks you selected will convert to basic disks. Besides, the volumes will convert to partitions as shown below.
- Click on Apply on the top-left corner of the screen to start the conversion process.
- If the tool asks for any permission, grant the permission.
All your dynamic disks will convert to basic.
Convert Dynamic Disk With Mirror Volumes To Basic
As the name suggests, the mirrored volume on a dynamic disk is the volume that stores the data copy of another volume. To convert a dynamic disk with mirror volumes to basic, I recommend using disk management since that also ensures no data loss.
- Right-click on the Windows key on your system and navigate to Disk Management. Alternatively, you can open the Run Command prompt and type the command – msc. The Disk Management window will open up.
- You will see multiple volumes with their other information such as layout, type, capacity, etc. Right-click on each or desired volume and select the Delete Volume
- Follow the above step for every volume. Make sure to delete all volumes before converting the disk to basic.
- Once done, right-click on the disk and select the Convert to Basic disk
So, this is how you can convert a dynamic disk with mirror volumes to basic.
Conclusion
So, that is all for dynamic and basic disks on Windows 10/11. Every disk on the OS is basic by default. However, you can convert it to dynamic if you want better performance out of your OS.
Nevertheless, a dynamic disk is not recommended for certain situations as discussed below. Hence, you should convert the dynamic disk to basic. The only concern is data loss.
To convert dynamic disk to basic disk without losing data, I recommend backing up all your data before converting. Furthermore, it would help if you either use the built-in disk management tool or command prompt.