Dear followers of Get-ITsolutions.com, as you may now we have started a series of article helping you discover the powers of using PowerShell creating scheduled task. In our today’s guide we will cover three different ways on how to export and import scheduled tasks. You can import and export scheduled task using Command Prompt or PowerShell. If you are new to Windows Task scheduler we recommend you to check on our previous article in here.
What is Windows Task Scheduler?
For fully automation needed to be scheduled for automatic running. The Task Scheduler allows you to create all kinds of automated tasks in Windows. The graphic interface of Taskschd.msc console is used to create Windows Task Scheduler jobs. The Task Scheduler is a useful tool that has been around for several years, and it provides a friendly graphical interface to create automated routines. By using this tool, you can automate tasks to launch applications, run specific commands, or execute scripts at a selected schedule or once a condition is met.
In our previous article we have already created PowerShell scheduled task so another benefit of Task Scheduler is the ability to quickly export and import your tasks using different ways. You can import scheduled task using PowerShell; you can import scheduled task using Command Line. But also you play around in your daily job as sysadmin and export scheduled tasks using PowerShell or export scheduled tasks using Command Line. Keep in mind that all the actions mentioned above can be also done manually by exporting and importing scheduled tasks using Task Scheduler also.
How to export and import scheduled tasks using Task Scheduler
You can manually exporting and importing scheduled tasks using Task Scheduler also by following the guide below.
Export scheduled tasks using Task Scheduler
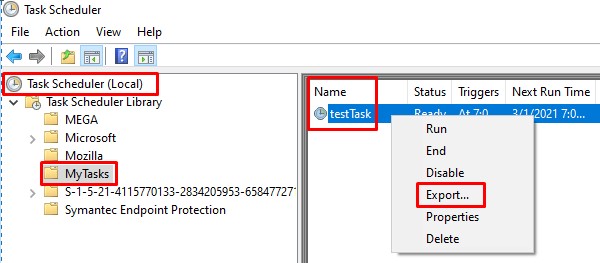
To export a scheduled task using Task Scheduler, use these steps:
- Open Start.
- Search for Task Scheduler, and click the top result to open the experience.
- Browse to the location of the scheduled task that you want to export.
- Right-click the item, and select the Export option.

Export scheduled tasks using Task Scheduler
- Browse and open the folder to export the task.
- Click the Save button.
Once you complete these steps, you’ll end up with a .xml file that you can then import to another computer. Using Task Scheduler, you can only export (or import) one task at a time, as such you’ll need to repeat the steps manually in order to export additional scheduled tasks.
Import scheduled tasks using Task Scheduler
To import a scheduled task using Tasks Scheduler use these steps:
Note: By using this option you can only restore the task but you cannot restore the script or application that the task will execute. If you’re importing a task that runs a script or starts an application, you need to make sure that those resources exist on the device before proceeding with the steps below. Otherwise, the scheduled task will fail.
- Open Start.
- Search for Task Scheduler, and click the top result to open the experience.
- Browse to the import location.
- Right-click the folder, and select the Import Task option.
- Browse and open the folder with the scheduled task.
- Select the task.
- Click the Open button. Note: You can also update the scheduled task settings as necessary.
- Click the OK button.
- After completing the steps, the task will import automatically on your device.
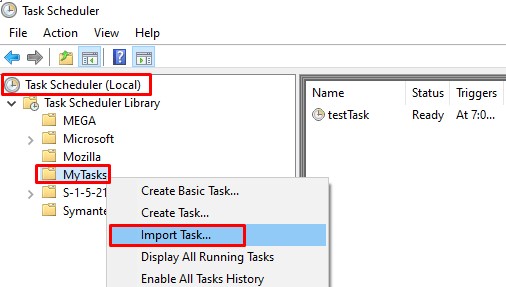
Import scheduled tasks using Task Scheduler
How to export and import scheduled tasks using Command Line
For fully automation you can import and export scheduled task using Command Line
Export scheduled tasks using Command Line
To export a scheduled task using Command Prompt use these steps:
- Open Start.
- Search for Command Prompt, right-click the top result, and select the Run as administrator option.
- Type the following command to export a scheduled task and press Enter. In the command, make sure to update the command (“\TASK-PATH-TASKSCHEDULER\TASK-NAME,” “%UserProfile%\EXPORT-FOLDER-PATH\TASK-EXPORT-NAME.xml) with your device details.
- Once you complete the steps, the task will be exported as a .xml file in the location you specified.
- If required make sure to type your administrator or account password and press Enter
- After you complete the steps, the new scheduled task will be created using the exported settings in the location you specified in Task Scheduler.
schtasks /query /xml /tn "\TASK-PATH-TASKSCHEDULER\TASK-NAME" > "%UserProfile%\EXPORT-FOLDER-PATH\TASK-EXPORT-NAME.xml"
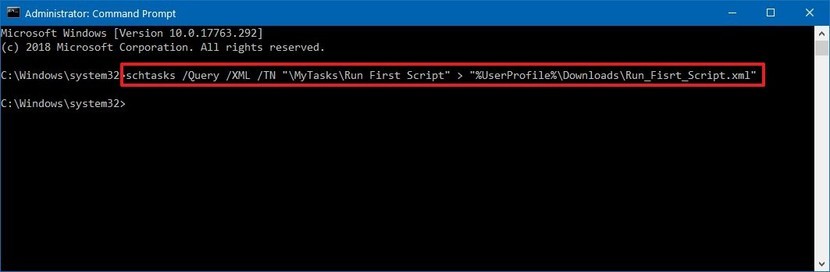
Export scheduled task using command line
Import scheduled tasks using Command Line
Command Prompt does not offer an import option. Instead, you’ll need to use the “create” flag to create and schedule a new task using the exported settings in the .xml file.
To import a scheduled task using Command Line, use these steps:
- Open Start.
- Search for Command Prompt, right-click the top result, and select the Run as administrator option.
- Type the following command to import a scheduled task and press Enter. In the command, make sure to update the command (“%UserProfile%\IMPORTED-FOLDER-PATH\TASK-INPORT-NAME.xml,” “\TASKSCHEDULER-FOLDER-PATH\TASK-INPORT-NAME,” “COMPUTER-NAME\USER-NAME”) with your device details.
schtasks /create /xml "%UserProfile%\IMPORTED-FOLDER-PATH\TASK-INPORT-NAME.xml" /tn "\TASKSCHEDULER-FOLDER-PATH\TASK-INPORT-NAME" /ru "COMPUTER-NAME\USER-NAME"
Note: If required make sure to type your administrator or account password and press Enter
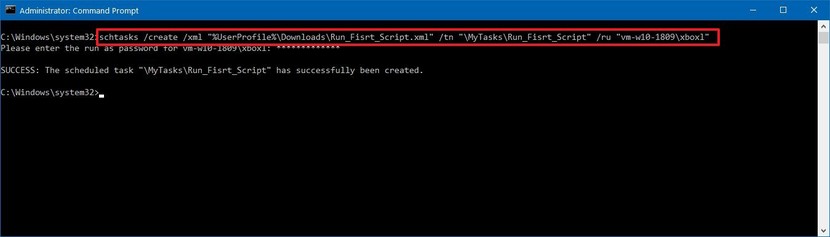
Import scheduled task using command line
How to export and import scheduled tasks using PowerShell
Similar to the Command Prompt option, for fully automation you can import and export scheduled task PowerShell.
Export scheduled tasks using PowerShell
To export a scheduled task using PowerShell use these steps:
- Open Start.
- Search for PowerShell, right-click the top result, and select the Run as administrator option.
- Type the following command to export a scheduled task and press Enter. In the command, make sure to update the command (“TASK-NAME,” “\TASK-PATH-TASKSCHEDULER\,” “C:\PATH\TO\EXPORT-FOLDER\TASK-EXPORT-NAME.xml”) with your device details.
Export-ScheduledTask -TaskName "TASK-NAME" -TaskPath "\TASK-PATH-TASKSCHEDULER\" | out-file C:\PATH\TO\EXPORT-FOLDER\TASK-EXPORT-NAME.xml

Export scheduled task powershell
Once you complete these steps, the task will export into a file using a .xml extension, which you can then use to import the same task on the same or another computer or installation.
Import scheduled tasks with PowerShell
Although there is an “Export” cmdlet, you won’t find an “Import” cmdlet variant using PowerShell. Instead, you’ll need to register a new task that will import the same settings included in the exported .xml file.
To import a scheduled task using PowerShell use these steps:
- Open Start.
- Search for PowerShell, right-click the top result, and select the Run as administrator option.
- Type the following command to import a scheduled task and press Enter. In the command make sure to update the command (“C:\PATH\TO\IMPORTED-FOLDER-PATH\TASK-INPORT-NAME.xml,” “TASK-IMPORT-NAME,” “\TASK-PATH-TASKSCHEDULER\,” “COMPUTER-NAME\USER-NAME”) with your device details.
- After completing these steps, the exported scheduled task will be imported to the location you specified in Task Scheduler.
- Note: If the command fails or you don’t want to enter the password manually, make sure to append the
-Password ACCOUNT-PASSWORD(replacing “ACCOUNT-PASSWORD” with your actual password) after specifying the “COMPUTER-NAME\USER-NAME” parameters.
Register-ScheduledTask -xml (Get-Content 'C:\PATH\TO\IMPORTED-FOLDER-PATH\TASK-INPORT-NAME.xml' | Out-String) -TaskName "TASK-IMPORT-NAME" -TaskPath "\TASK-PATH-TASKSCHEDULER\" -User COMPUTER-NAME\USER-NAME –Force
Conclusions
In our today’s guide we covered three different ways on how to export and import scheduled tasks. We showed you three different way how to do it by using Task Scheduler, Command Prompt and PowerShell.
