Out of over 500 BSoD errors known so far, the Resource Not Owned is the most commonly encountered one. If not treated initially, the error can further lead to other PC-related issues, such as instability, data loss, poor system performance, and the like.
Thus, you should act quickly and solve the error code. In this article, I have discussed the top causes of the error and the quick solutions that helped me in avoiding a major issue. So, let’s get started.
But before that, it would be wise to understand what BSoD signifies.
Understanding “Resource Not Owned” BSoD Error
Let’s first understand what BSoD is. BSoD is the short form for Blue Screen of Death. Its other names include stop error and stop screen as it puts the entire system on hold or in a non-working situation. Hence, it is very difficult to deal with.
The BSoD error strikes from nowhere and results in a complete data loss and other issues such as the Resource Not Owned error.
If the above error message appears on your screen, recently downloaded apps or programs may not be compatible with your Windows. So, consider removing them. In most cases, WinDVD is one such application.
Let’s now understand the other causes of the above error message and its solutions.
What Causes The Resource Not Owned BSoD Error On Windows 11/10/7?
Various causes contribute to the Resource Not Owned error on Windows 11/10/7. These are:
- Software corruption
- Faulty hardware (i.e., inconsistent power supply, bad memory, or overheating)
- Damaged hard disk
- Corrupt or damaged system files
- Outdated or incompatible drivers
- Outdated Windows
Once you have understood the reason behind the Resource Not Owned BSoD error, you can try the following solutions.
How To Fix Resource Not Owned BSoD Error On Windows 11/10/7?
Here are the top eleven solutions you can try to resolve the BSoD error codes.
- Update Windows to the latest version
- Perform Windows 10 reset
- Update your device drivers
- Uninstall and reinstall your device drivers
- Perform an SFC scan
- Use CrystalDiskMark to check your hard drive
- Uninstall unnecessary or unwanted programs and applications
- From the Start menu
- From the Control Panel
- From the Settings
- Run the DISM tool
- Use the Memory Diagnostic Tool
- Run the troubleshooter
Read on as I present to you the step-by-step guides to implementing the above solutions on Windows.
Update Windows to the latest version
Keeping your Windows updated to the latest build is necessary to avoid bugs and compatibility issues among the hardware and software. If you are frequently experiencing the Resource Not Owned error, an outdated Windows is to be blamed here.
To update your Windows to the latest version, follow these steps.
- Hit the Windows key on your keyboard. You can also click on its icon on the bottom left corner of the screen.
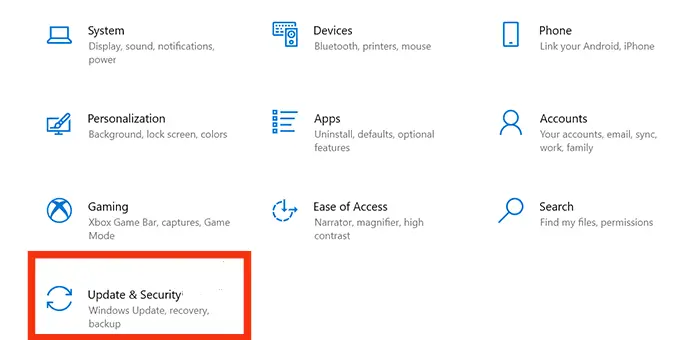
- Click on the Settings
- On the settings page, find the Update & Security option and click on it.
- Select the Windows Update option from the left side panel.
- On the right side of the screen, click on the Check for updates option to let the system check and install the update, if any.
Your Windows will get updated to the latest version. If you want, you can also schedule the update from the Advanced settings. Now, check if the resource not owned Blue Screen of Death error appears. If so, try the next solution.
Perform Windows 10 reset
To perform a Windows 10 reset, follow these steps.
- Launch the Settings.
- Select the Update & Security
- Click on Recovery from the left side panel.
- Under the Recovery section, you will find three options. These are Reset this PC, Go back to the previous version of Windows 10, and Advanced startup. Click on Get started under the Reset this PC.
- On the next screen, either choose to Keep my files or Remove everything.
- Follow the on-screen steps and when prompted, click on Reset.
Windows 10 reset
Now, check if the Resource not Owned error still appears or not. If yes, you are using outdated device drivers.
Update your device drivers
Sometimes, the old version drivers of a particular device are at fault. As a result, you get unwanted BSoD errors. To avoid this, always keep the drivers updated to the latest version. You can do so either manually or automatically.
Follow the given steps for the same.
- Launch the Control Panel and click on Device Manager. Alternatively, you can open the device manager directly from the Start
- On the Device Manager window, scroll down to the Network Adapters option and expand it by clicking over it.
- Now, select the available driver and right-click on it to open a context menu.
- Click on the Update driver option from the menu.
- On the Update driver page, click on Search automatically for drivers or Browse my computer for drivers as per your preference. Nevertheless, I recommend the former to avoid extra steps to update the drivers.
Repeat the above steps for the other drivers installed on your system. Restart your PC and check if the Resource not Owned error persists or not. If yes, try the next method.
Uninstall and reinstall your device drivers
If updating the drivers doesn’t work for you, you might need to uninstall and reinstall the disputed driver to solve the issue.
Here are the steps to uninstall and reinstall the device drivers on Windows 11/10.
To uninstall the drivers:
Follow the steps discussed in the method “update the drivers” till the point you expand the Network adapters option. Next, follow the given steps.
- Right-click on the disputed driver and select Uninstall device from the context menu. A confirmation dialog box will appear.
- Tick the checkbox next to Delete the driver software for this device. Click on Uninstall.
- Restart the PC to apply the changes.
To reinstall the drivers:
Now, you would need to reinstall the driver. To do so, on the Device Manager, click on the Action tab, and select the Scan for hardware changes option.
The Windows will scan the PC for any hardware changes i.e. the uninstalled device driver and reinstall it.
Perform an SFC scan
Another great way to fix the resource not owned BSoD error on Windows 11/10/7 is by running the SFC tool and checking for the disputed files. To run the SFC tool, follow these steps.
- Type cmd in the Search box and select Command Prompt from the results. Right-click on it and select Run as Administrator.
- As the Command Prompt opens up, type the command sfc /scannow and hit the Enter
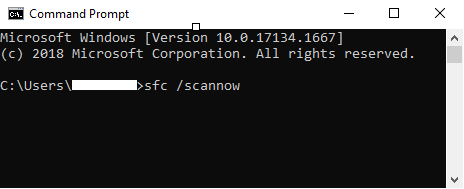
WerFault Error sfc scan now command
The system file checker (SFC) tool will run, scan, and repair all the disputed files on your system to fix the resource not owned issue.
Use CrystalDiskMark to check your hard drive
Next comes checking your hard drive’s health. As you would know, hard drives use the S.M.A.R.T technology to analyze their health and reliability. You can also view the drive’s health status and other pieces of information as a user.
However, you would need to use a program called CrystalDiskMark installed on your system. It is open-source, free, and very straightforward to use.
Once installed, it will examine your hard drives and return the results with different markings. For example, “good” if your drives are in good condition, “bad” if your drives are in bad condition, “caution” if your drives are at risk and you must keep an eye on them, and “uncertain” if the program could not collect enough info.
Uninstall unnecessary or unwanted programs and applications
Do you have multiple third-party programs or applications installed on your PC? Did you start getting the unwanted BSoD error after you installed such applications? If yes, you can get rid of the errors by uninstalling them.
Here are some ways to search for and uninstall unnecessary or unwanted programs and applications on your Windows.
- From the Start menu
- Click on the Start
- Now, look for the unnecessary or unwanted apps or programs you wish to delete. Right-click on them and select Uninstall from the menu. Click on Yes if prompted.
- From the Control Panel
- Launch the Control Panel.
- Click on the Programs and Features option to find the various programs present on your computer.
- Right-click on the desired program and select Uninstall.
- From the Settings
- Launch the Settings.
- On the left sidebar, select Apps.
- You will find the entire list of installed apps on the right-hand side.
- Search for the unnecessary apps and programs, click on the three vertical dots, and select Uninstall.
- Allow if prompted.
These are the three ways to uninstall unnecessary or unwanted apps and programs on your PC.
Run the DISM tool
The DISM or Deployment Image Servicing and Management is a built-in command-line tool that prepares, modifies, and repairs system images. However, it is also a great option to try for other system issues like BSoD errors.
To run the DISM tool, follow these steps.
- Click on the Search
- Type cmd in the search box and select Command Prompt from the results.
- Right-click on it and select Run as Administrator.
- Enter the command – DISM /Online /Cleanup-Image /CheckHealth and hit the Enter
Run DISM
Let the command-line tool scan your system and repair the image and probably, the BSoD error. Are you still getting the Resource not Owned error? Let’s test the RAM then.
Use the Memory Diagnostic Tool
You must check your RAM when your system is running slow, apps crash, or the overall PC performance is down. Right? However, you should also test your memory for BSoD errors as they are also associated with the RAM.
Now, Windows has a built-in RAM monitoring tool, called the Memory Diagnostic Tool, on all its versions, including Windows 11/10/7.
To launch the Memory Diagnostic tool, here is the step-by-step guide.
- Click on the Search
- Type Memory Diagnostic Tool in the search box and select the top result. Alternatively, open the Run box and run the command – exe to launch the tool.
- The Memory Diagnostic Tool dialog box will open. Click on the Restart now and check for problems (recommended).
As soon as you select the option, your PC will restart and you will see the status of the scan on your screen. It is a time-consuming process and may take several minutes to complete.
Once completed, the tool will display the results as you log in to your PC.
Note: If Windows built-in diagnostic tool does not yield the desired results, you can also use a third-party tool, called MemTest86. It uses the latest algorithms and is completely free to use for the x86 and ARM computers.
Now, check if the Resource not Owned error shows up or not. If yes, try the next method.
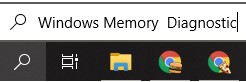
Windows Memory Diagnostic
Run the troubleshooter
If none of the above options work for you, I recommend running the BSoD troubleshooter. Follow these steps.
- Launch Settings.
- Click on the Update & Security
- On the left side panel, select Troubleshoot.
- Look for the troubleshooter for BSoD and click on it.
The troubleshooter will run and scan the main cause of Blue Screen of Death.
These are the top 10 solutions to fix the Resource not Owned BSoD error on Windows 11/10/7.
Conclusion
So, here you go. The Blue Screen of Death (BSoD) is the second most unwanted issue one can come across on their system after ransomware. It leads to a complete loss of data and may introduce several other errors, such as Resource not Owned.
If you are facing the same problem, try out the above methods and let us know if you face any problems.