Get IT Solutions

How to do IT
Menu
  • Home
  • SCCM 2012
    • Deploy Packages
    • Troubleshooting errors SCCM 2012
  • Windows
    • Applications Silent Install
    • Windows Tools
    • Windows Error
    • Script
    • Exchange Server
    • Troubleshooting Office
    • Applications Errors
  • Database
    • SQL Server
    • MySQL
    • Oracle
  • Cybersecurity
  • Other
  • Reviews

Fixed: Windows Can’t Communicate With The Device Or Resource “DNS Server”

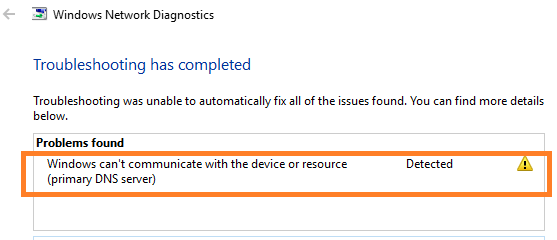
DNS servers play a key role when connecting the internet. If DNS settings or servers aren’t configured properly you’ll not be able to connect online. You might start surfing the web smoothly and then suddenly your internet connectivity is interrupted. After running Windows Troubleshooter, you get the error message “Windows can’t communicate with the device or resource DNS Server”. This error shows that your PC can’t connect to the primary DNS server or at least having a problem with DNS.

Causes Of The Error Windows Can’t Communicate With The Device Or Resource DNS Server

The windows can’t communicate with the device or resource DNS Server error is mainly caused by wrong DNS settings or configurations, and secondly, network driver problems. If you haven’t have updated your network driver for a while, or the DNS server you use isn’t available, you’ll end up with this error.

Table of Contents

  • How To Fix Windows Can’t Communicate With The Device Or Resource “DNS Server”
    • Update network driver
    • Rollback driver updates
    • Change adapter settings
    • Change your DNS to Google Public DNS
    • Reset network connections
    • Reset TCP/IP
    • Clear DNS Cache
    • Change host file
    • Scan for Malware and Virus

How To Fix Windows Can’t Communicate With The Device Or Resource “DNS Server”

As a quick workaround, you should restart your modem or router when you encounter the error “Windows can’t communicate with the device or resource”. It might be possible that your internet connection gets interrupted and hence need to be fixed. You should switch off your router using the power button and then disconnect all cables. After a few minutes, you should power ON the router again and reconnect all the cables. This way you’re refreshing the network and if you’re lucky you can get rid of the error. If the error isn’t resolved, you can now proceed with the following troubleshoots we’re going to outline below.

Windows Can’t Communicate With The Device Or Resource

Windows Can’t Communicate With The Device Or Resource

Update network driver

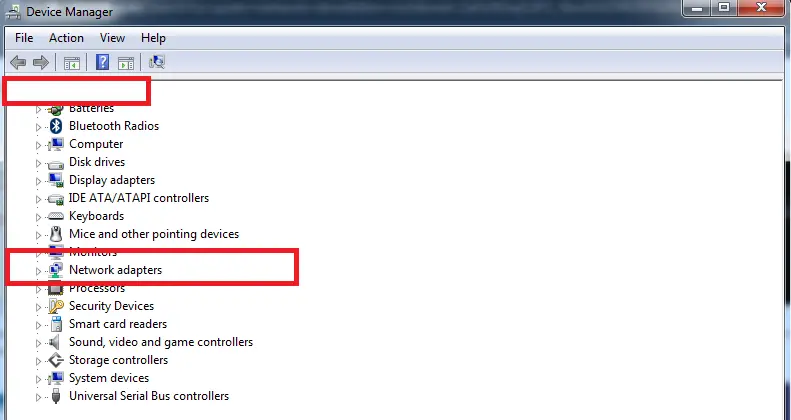
  1. Press Windows + X keys on your keyboard.
  2. From the list that shows up in the windows that open, you select ‘Device Manager’.
  3. Select your network driver and right-click on it.
  4. From the context menu, you should select ‘Update’.
  5. Device Manager will now search for updates if available and then install them on your machine.
  6. After the update has finished, you should restart your PC and then check to see if the error is gone.

Sometimes you can have a problem installing the updates from ‘Device Manager’, if you receive an error when trying to install the updates, you should install them manually. Here is how to do that:

  1. You should know the model number of your network card driver which can be seen from the device manager under properties.
  2. You now visit the vendor’s website.
  3. Search the latest version of your network driver model.
  4. Then you download the file on your computer.
  5. When the file is on your drive, you can now open to install.

There are also special tools out there like ‘Auslogics Driver Updater’ that can help you update all your drivers at once, with powerful tools like this, you don’t need to manually check for updates for each of your drivers. Download this tool if you want to save yourself time.

Update Network Drive

Update Network Drive

Rollback driver updates

If you start to encounter the error windows can’t communicate with the device or resource after installing new updates, you need to remove these updates because it shows that it’s not compatible with your OS, and removing them will bring back your PC to normal. Here is how to remove installed driver updates:

  1. Open the device manager and locate your network driver as you did in the steps above.
  2. Right-click on your network driver and select ‘Properties’.
  3. Head over to the ‘Driver’ tab.
  4. You see the button ‘Roll Back Driver’, and you need to click on that to remove the recent updates installed.
  5. Confirm the action by clicking yes.
  6. When done, you can now check to see if the error is gone.

You can also remove updates manually by deleting the network driver and then install an old version that has worked for you, just right click on the network driver and you’ll see the option ‘Delete’ or ‘Remove’ from the context menu. When it’s removed, you then visit the vendor’s website or other sources online to download old versions that have worked for you, download the files and install on your PC.

READ ALSO -   Resolving “log on as batch job rights” request from Task Scheduler

Change adapter settings

  1. Open Control Panel on your PC, you can look for it using Windows search or you can right-click on the Windows logo and then select “Control Panel”.
  2. Click on “View by” to choose the “Large icons” option.
  3. Find the “Network and Sharing Center” and click on it.
  4. By the left pane you’ll see the option ‘Change adapter settings’, you should click on it.
  5. On the Network Connections screen, you should select your network and right-click on it.
  6. Select ‘Properties’ from the context menu.
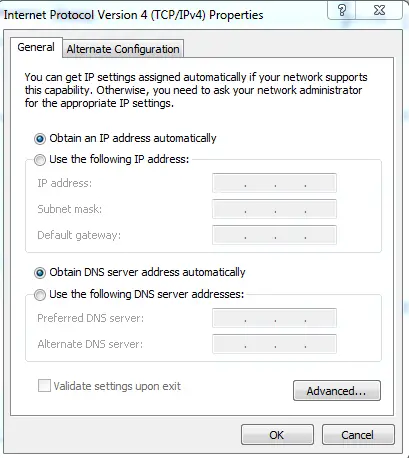
  7. Head over to Internet Protocol version 4 (TCP/IPv4) and click on the “Properties” button.
  8. On the General tab, you should check the options ‘Obtain an IP address automatically’ and ‘Obtain DNS server address automatically.
  9. Click Ok to apply the changes.
  10. You now restart your Pc and check to see if the error has been resolved.
Change adapter settings

Change adapter settings

Change your DNS to Google Public DNS

  1. Go to the control panel as you did previously and select the “Network and Sharing Center”.
  2. Click on ‘Change adapter settings’.
  3. Right-click on your network and select Properties from the context menu.
  4. Choose Internet Protocol Version 4 (TCP/IPv4).
  5. Click the Properties button.
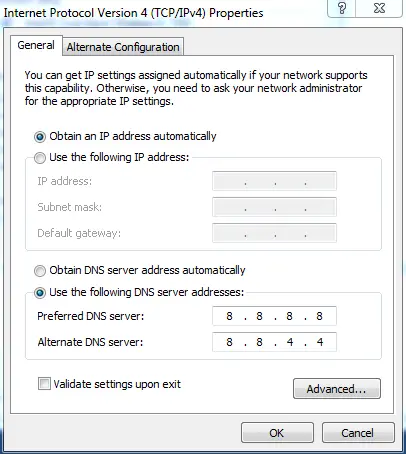
  6. Check the option that says ‘Use the following DNS server addresses’.
  7. For the “Preferred DNS Server” you should type 8.8.8 and for the “Alternate DNS server”, you should type 8.8.4.4
  8. Click Ok for the changes to take effect and also restart your PC.
  9. Check to see if the problem is resolved.
Change your DNS to Google Public DNS

Change your DNS to Google Public DNS

Reset network connections

The fast way is to use the command prompt, here are the steps:

  1. Open the command prompt, you can locate it by using Windows Search or any shortcut you might have on your PC.
  2. Right-click on the command prompt and select “Run as Administrator”
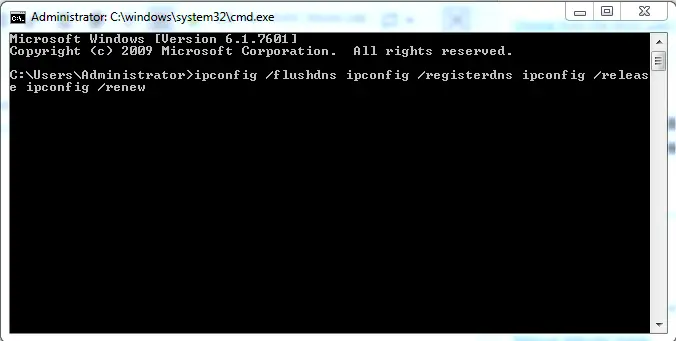
  3. You now run the following commands one-by-one:
ipconfig /flushdns

ipconfig /registerdns

ipconfig /release

ipconfig /renew
  1. You should hit enter after each command to run separately and when finished. Restart your computer and check for the error.
Reset network connections

Reset network connections

Reset TCP/IP

  1. Open the command prompt and “Run As Administrator” as you did in the previous step.
  2. Then you run the following commands one-by-one while pressing enter after each command:
ipconfig /flushdns

nbtstat –r

netsh int ip reset

netsh winsock reset
  1. Restart your computer and check if the error is gone or not.

Clear DNS Cache

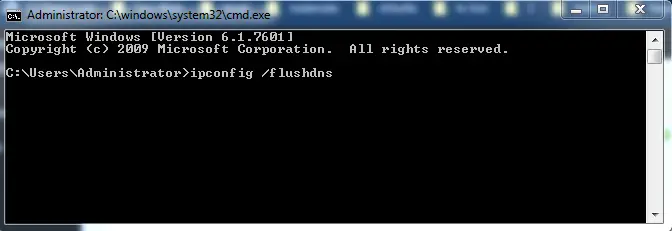
  1. Open Command Prompt and Run as Administrator.
  2. You should now type ipconfig /flushdns in the command prompt window.
  3. Press enter and wait until the process is finished.
  4. This will flush DNS Cache on your PC.
  5. Close the command prompt and check to see if the error is gone or not.
Clear DNS Cache

Clear DNS Cache

Change host file

  1. You should navigate to this path on your pc: C:\Windows\System32\drivers\etc
  2. Locate “Hosts” files that are in the directory and click to open it.
  3. Delete all the content that’s inside and save it by pressing Ctrl + S keys or from the file menu by selecting “Save”.
  4. Reboot your PC and check to see if the error is gone.

Scan for Malware and Virus

Use any security software you might have. You can use it with Windows Firewall which already available in your Windows Operating System. Run a scan to see if there are malicious files on your PC, here is how you can do that:

  1. Head over to “Settings” on your PC.
  2. Select “Update and Security”.
  3. Go to ‘Windows Security’ and then choose “Virus & Threat Protection”.
  4. Click “Run a new advanced scan” and then “Full Scan”.
  5. Hit the “Scan Now” button to start your scan.

These are the best solutions that work when it comes to eliminating the error “Windows can’t communicate with the device or resource” on your PC. We hope you find it helpful and if you have any questions or want to share something useful, do let us know in the comment section below.

Share
Tweet
Google+
Pinterest
Linkedin
Stumble
Email
Prev Article
Next Article

Related Articles

Err_ssl_version_interference error
The ERR_SSL_VERSION_INTERFERENCE error appears when Google Chrome fails to load …

Err_ssl_version_interference error – How to solve it?

The Application Was Unable To Start Correctly 0xc0000142
In this post we’ll share the best possible solutions to …

The Application Was Unable To Start Correctly 0xc0000142 – Windows 10 Fix

Best Computers & Laptops

Best Computer for Cyber Security – Laptop and Desktop
Best Computer for Cyber Security
Hey, are you seeking the best computer for cyber security? Well, we must say you have come to the right place to find your answer and guidance. There are a plethora of products out there for you to pick from ...
Read More
Best Computer for Microsoft Office & Excel – Laptop and Desktop
Best Computer for Microsoft Office & Excel
Are you finding the Best Computer for Microsoft Office and Excel? In modern days, the best laptop or desktop set is the one which is both portable, has good looks and offers the smoothest performance. Microsoft Office is a package ...
Read More
Best Computer for Hacking – Laptop and Desktop Selection
Best computer for Hacking
When it comes to hacking, either laptop or desktop, choosing the best computer for hacking would be an exhilarating job. There are many specifications to be considered for hacking ...
Read More

SQL Server Tips

FIX sqlstate 42000 – mysql error 1064 – you have an error in your sql syntax
Sqlstate 42000 Is a general code that come together with other number. Most often comes with the code 1064 and ...
Read More
The execute permission was denied on the object – SQL Server Error
The execute permission was denied on the object
The following article will handle “the execute permission was denied on the object” error appears on SQL Server. This error ...
Read More
How to Read Data from LDF file in SQL Server – A Complete Guide
Read LDF File
Hello Everyone, Today we are going to address the most popular query of SQL users, how to read data from ...
Read More

Search

We are on:

Get FREE SPACE for your PC

3 Method to Delete Temp Files in Windows 7/10 including vbs script

In this post we will explain how to delete temp files windows 7 using three different methods including vbs script ...
Read More

Fastest way to delete hiberfil sys from windows 10/8/7 and XP – CMD

In this article we will explain how to remove or delete hiberfil sys from Windows 10/8/7 and XP . If you does ...
Read More

Learn How to Silent Install Applications

Silent Install Adobe Flash Player
In this tutorial will explain how to silent install adobe flash player 25, Msi and Exe version. How to disable auto update and uninstall older ...
Read More
Java Silent Install and Uninstall Older Version – Deploy Package MSI
This tutorial will explain how to silent install Java MSI/EXE version and disable auto-update. The command line will also uninstall the ...
Read More
Silent Install Adobe Shockwave Player 12 and disable update
In this tutorial will explain how to silent install Adobe Shockwave Player 12 msi and disable auto update. The command will uninstall older ...
Read More
Silent Install Google Chrome MSI, Silent Uninstall and Disable Auto Update
This tutorial will explain how to silent install Google Chrome MSI and disable auto update. The command will uninstall older version of ...
Read More
Silent Install Adobe Reader 11 and DC – msi and exe – disable update
In this tutorial will explain how to silent install Adobe Reader version 11 and DC. We will user both version "msi" ...
Read More
Silent Install Mozilla Firefox msi and exe file – Including Silent Uninstallation
This tutorial will explain how to silent install Mozilla Firefox. We will use MSI and EXE files to perform a silent ...
Read More
Skype Silent Install Msi and disable updates
In this tutorial will explain how to silent install skype  and disable auto update. The command will uninstall older version of Skype and ...
Read More
Filezilla Silent Install msi and exe version
Filezilla silent install tutorial will explain how to perform a silent installation of application. We will explain methods, silent install ...
Read More
Silent install VLC Media Player
In this tutorial will explain how to silent install VLC Media Player. We will explain both methods for exe and ...
Read More
Notepad++ silent install exe and msi version – Command Line
Notepad++ silent install is the new article from a series of silent installations. Notepad++ as free software has two main ...
Read More

Batch File Solutions

How to list files in cmd – Command Prompt – Windows 10
Whenever you want to search and make a list of all files on a specific folder, you used the windows ...
Read More
Batch rename multiple files in folder – CMD script – Bulk Method – Win 10
The following article will teach how to rename multiple files in a folder with the bulk method using Command Line ...
Read More
Batch script rename file using Command Line (CMD) & PowerShell – Windows 10
The following article will use the “rename” or “ren” command to rename the file using a command prompt. Also, we ...
Read More
Change extension of multiple files at once – CMD batch file
The following article will teach the methods to change the extension of multiple files at once using command prompt and ...
Read More
How to delete registry key with command line | PowerShell | Batch
The following article is the third of series about registry and working on it through command line (CMD) and PowerShell ...
Read More
How to add registry key & values with CMD | PowerShell | Batch
The registry is the place where most of the applications store the settings but not only. Used also from the ...
Read More
Unmap Network Drive CMD – (Batch file) – net use delete command
After we posted the methods to map network drive using cmd commands we come this time with the method to ...
Read More
Map Network Drive cmd (batch file) – net use user password
This article will focus on another way to map a network drive on your computer instead of from the explorer ...
Read More
How to Find Large Files on Windows 7 & 10 – CMD Forfiles Command
If the capacity of your hard drive is running low, it is time to clean off some files and to ...
Read More
CMD Script to check disk space on windows and multiple remote servers
The following article will provide you script to check disk space. The Script monitor space on windows and multiple remote ...
Read More

Get IT Solutions

How to do IT

About Us

Get IT Solutions is a personal blog, which is managed to guide people for various topic.

Second Menu

  • Donate
  • About Us
  • Contact Us
  • Privacy Policy

What Will You Find

Automation is our area of writing where are included scripts, batch and various tips to automate your daily job.
Copyright © 2025 Get IT Solutions