Have you ever faced issues while accessing any file or folder on your system? If so, you would have found the requested operation requires elevation error message on your screen.
Though it is a common issue and related to ownership permissions, it is very annoying, especially when you urgently need to access a file or folder.
No worries!
I have compiled the best solutions to eliminate the problem forever (do not forget to check the bonus hack at the end). But before that, let us discuss the error in detail and its possible causes.
Meaning of the “The Requested Operation Requires Elevation” error on Windows 11/10/7
“The requested operation requires elevation” error on Windows means that you are not authorized to access the files/folders or the permissions to do are now considered foreign to your computer.
As the error message states – the requested operation requires elevation, you need to ask the local administrator for ownership of the files/folders to access them. Then only, you can read, write, modify, or delete them. Here, the term “elevation” signifies the local administrator.
There are several reasons why you face the requested operation requires elevation error on Windows 10 as discussed in the next section.
4 causes of “The Requested Operation Requires Elevation” Error
As aforementioned, here are the four common causes of the requested operation requires elevation error besides the permission issue.
- Your current Windows account is either corrupt or damaged. In either case, I recommend creating a new account as an admin to solve the error.
- (Only for Pro Windows users!) The local group policy of Microsoft directs how an admin account operates under the admin mode. To solve the error, you would need to use the Local Group Policy editor to allow admin accounts to work outside the admin approval mode.
- Did you set strict UAC rules for it to operate? If yes, that is another reason behind the requested operation requires elevation error on Windows. Try easing out the rules or disabling them to solve the problem.
- A severe AV (antivirus) security suite often marks 100% safe and legal programs as a threat. As a result, the requested operation requires elevation error arises. Try adding the disputed program to the exception or disabling the AV.
How Can I Fix “The Requested Operation Requires Elevation” Message?
Once you know what is responsible for the error, you can work around the following solutions according to your preference.
- Disable User Account Control (UAC)
- Run the disputed program as an admin
- Reset folder permission
- Change Security Options In The Group Policy Editor
- Repair system files using SFC
- Change External Hard Drive Ownership
- Disable your third-party antivirus (AV)
- Add Domain admins group to the Local Administrators group
- Disable the Admin Approval Mode for built-in Administrator
- (Bonus hack) Update your device drivers
Let us discuss each of these solutions in detail below by starting off with turning the UAC off.
1. Disable User Account Control (UAC)
The UAC is a critical security feature in your PC. If any program or application needs complete access to your computer, they will have to ask the UAC first. That is, it is up to the UAC to let the applications access your system or not.
If disabled, all programs and applications will run in the administrative mode. That too, without permission. Hence, I do not recommend turning off UAC. However, if it is necessary to do so, make sure to enable it again.
Follow these steps to turn off UAC.
- Open the Search box and enter user account control in the input field. Hit the Enter key to open the User Account Control
- Once the UAC window opens, find and click on the Change User Account Control Settings
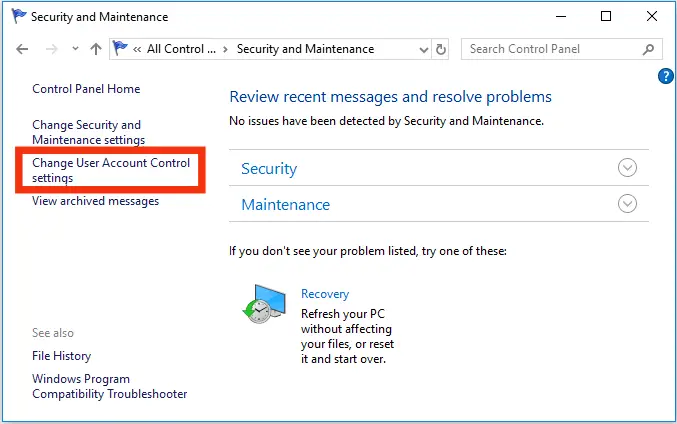
Change User Account Control Settings
- You will see a blue slider with “Always Notify” and “Never Notify” mentioned at either end of the slider. Slide the bar to Never Notify.

Never Notify
- Click on OK to turn off UAC.
- Click Yes if prompted.
Now, please restart your computer to apply the settings.
2. Run the disputed program as an admin
Another hack to solve the requested operation requires elevation error is by running that disputed program or file as an admin. To do so, follow these steps.
- Open the Search box and search for the specific program you wish to run as an admin.
- Do not open the program. Instead, right-click on it and click on the Open file location option from the menu.
- The Properties window of that program will open. Click on the Shortcut tab and select Advanced.
- Tick the checkbox next to Run as administrator and click on OK.
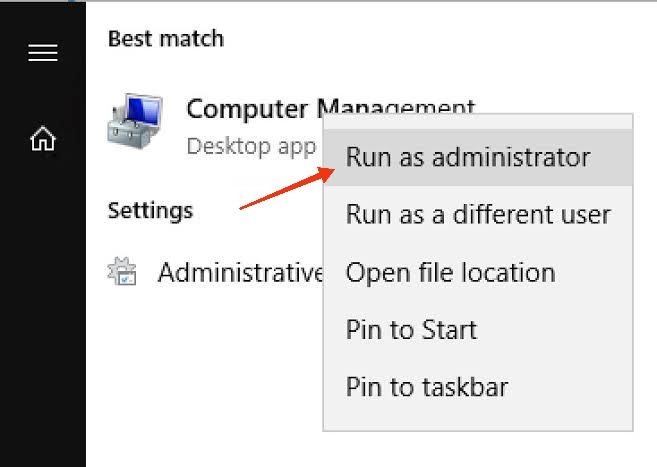
Run as administrator
The above program will always run as an administrator if you run it from the shortcut created above.
3. Reset folder permission
Resetting the files and folders permissions on Windows is very straightforward. You can do so by either the icacls command or the secedit command.
Follow these steps to execute the icacls command.
- First and foremost, you need to be the owner of the target file or folder.
- If you are the owner, launch the Command Prompt on your system.
- Execute the command – icacls * /t /q /c /reset
- Save the permissions to the file.
Follow these steps to execute the secedit command.
- Launch the Command Prompt on your system.
- Execute the command – secedit /configure /cfg %windir%\inf\defltbase.inf /db defltbase.sdb /verbose
- Save the permissions to the file.
If any warning pops up, ignore it.
These are the two commands to restore the default settings of files and folders.
4. Change Security Options In The Group Policy Editor
Follow these steps to access and change security options in the Local Group Policy editor on Windows 10.
- Launch the Group Policy Management Editor using any of these ways – Search box, command prompt, PowerShell, or Control Panel.
- Once the Local Group Policy Editor opens, navigate to the Security options folder under Local policies. Click on it.
- As the Security options folder opens, right-click on the User Account Control: Behavior of the elevation prompt for administrators in the Admin Approval Mode policy on the right panel. Right-click on it to continue.

User Account Control
- As the new window opens, go to the Local Security Settings tab and select Elevate without prompting from the drop-down menu.
- Click on Apply and then, on OK to apply the above changes.
Please restart the system and check if the requested operation requires elevation persists. If yes, do not give up as here is another solution.
5. Repair system files using SFC
The easiest way to scan for corrupt and damaged files is by running the built-in SFC (system file checker) tool. Another best part of the tool is that it automatically repairs the faulty files for you.
Follow these steps to repair the system files using the SFC tool.
- Launch the Run command box using the Search box or Windows + R
- Type cmd and hit the shortcut key combination of Ctrl+Shift+Enter to open Command Prompt as an admin.
- Once the Command Prompt opens, type sfc /scannow and press the Enter
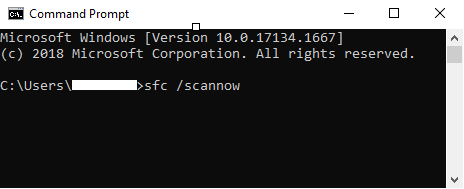
WerFault Error sfc scan now command
The tool will now get to work and return with the details. Note that this process may take considerable time.
6. Change External Hard Drive Ownership
Try this fix only if you are unable to access files from the hard drive. If not, you can skip this method.
To change hard drive ownership, follow the given steps.
- Log out of the computer and log in as Administrator.
- Open My Computer and navigate to your hard drive.
- Right-click on the external drive and select Properties.
- Click on the Security tab and click on Advanced.
- You will find the Owner You have to Edit it. To do so, click on the Edit option.
- As the Owner window opens, set the Administrator account as the owner of the external drive. That is, set your account as the owner.
- Once done, click on Replace owner on sub containers and objects.
- Apply the changes and click on OK.
Restart your computer and check if the requested operation requires elevation error exists. If yes, try the next solution.
7. Disable your third-party antivirus (AV)
Do you have an antivirus installed on your PC? If so, that is another reason behind the requested operation requires elevation error. This is because certain AVs inadvertently block access to even the legal programs.
In such situations, you should disable the antivirus or add the disputed programs to the exemption list.
Most AV lets you disable them from the Settings or directly from the Taskbar.
Once disabled, restart your PC and check if the earlier error persists. If yes, try the next solution.
8. Add Domain admins group to the Local Administrators group
There are several ways to add AD users to the Local Administrators group. However, my best hack is using the Group Policy. Let us discuss this below.
As the first step, create a GPO (group policy object) and link to the OU (organization unit).
Once completed, follow the given steps.
- Open the above-created GPO.
- Follow this path – Computer Configurations > Policies > Windows Settings > Security Settings > Restricted Groups.
- Right-click on Restricted Groups and select Add group.
- The Members of this group window will open up. Click on Add on the left side and select the AD users to be added to the Local Administrators group.
- Once done, click on Apply and OK to close the GPO.
Check if the error still shows up. If so, here is another fix.
9. Disable the Admin Approval Mode for built-in Administrator
When you update the Windows, the Admin approval mode for the built-in administrator gets enabled due to some reasons. As a result, you will have to ask for permission to do any administrative task even if you are the admin.
Hence, the requested operation requires elevation error is also caused by this.
Follow these steps to disable the above policy using the Group Policy Editor.
- Launch the Run box using the conventional Windows + R shortcut key combination. Alternatively, you can also use the Search bar or PowerShell to do so.
- Once it opens, execute the command – msc to open the Group Policy editor.
- As the GPE opens, navigate to Security Options under the Local Policies
- You will get a huge policies list on the right panel. Find User Account Control: Admin Approval Mode for the Built-in Administrator account Local Security Setting tab and right-click on it.
- Select Properties from the menu.
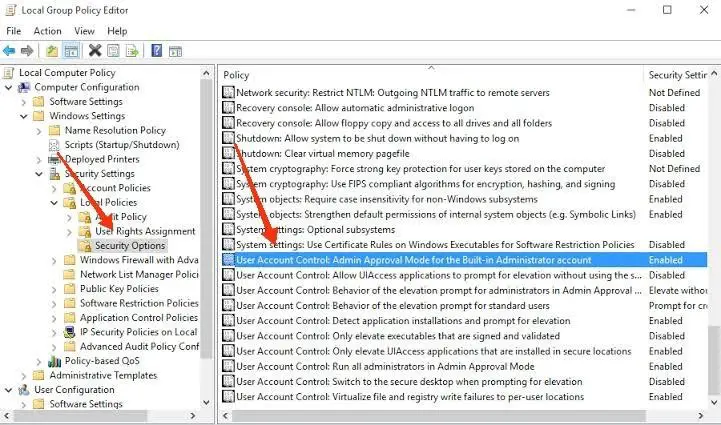
Admin Approval Mode for the Built-in Administrator account Local Security Setting tab
- On the next window, click on the Local Security Setting
- Click on Disabled.
- Click on Apply and OK to save the changes.
Please restart your computer to see the changes.
BONUS hack!!
10. Update your device drivers
Yes, outdated, corrupt, or damaged device drivers are the major cause of several Windows problems. So, I recommend updating them in this case as well.
Follow these steps to update your device drivers.
- Launch the Device Manager using any preferred method.
- Scroll down to Network adapters and click on it to expand it.
- Right-click on any driver and select the Update device option from the context menu.
- In the next window, you will have the option to update the driver manually or automatically. Select search automatically for updated driver software or browse my computer for driver software.
- Once you have selected the desired option, follow the on-screen steps to update the device drivers.
Restart the computer to see the effects. Your problem should have been solved by now.
Conclusions
So, here you go. These were the top solutions to gain access to the files and folders you were unable to access earlier and get away with the requested operation requires elevation error.
Try these out, especially the bonus hack, and let me know in the comments if you face any hurdles. I will be pleased to assist you.