One day were you simply trying to copy or create a file inside the C: (root drive) when you encountered the error “a required privilege is not held by the client?” The error has become quite prevalent among Windows users who attempt to use C: drive storage space. Why is this error occurring on your computer? Is there a permanent solution to your problem, or are you stuck with it? Let’s find out.
What Causes the “A Required Privilege Is Not Held by the Client”?
As the error “a required privilege is not held by the client windows 10” states, the file that you’re trying to copy, create, paste or modify does not have the right to be in that folder, and as a user, you do not have the privilege to take any action.
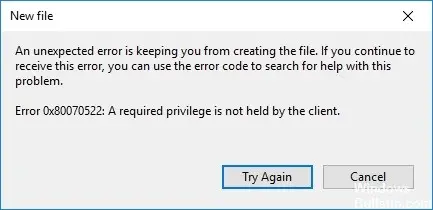
A code 0x80070522 is also present as a part of the error. It denotes that the action you’re undertaking can potentially harm the computer. The code also warns the user that moving necessary system files from the drive can damage the software.
The error is mainly caused by third-party antiviruses that hinder the routine working of the computer. If you have installed one, then get rid of it immediately. Other reasons you might be encountering this error include:
- Group Policy Editor’s protection policies
- Logged in via a non-administrative account
- Handling user accounts
- No proper access to the user account
How to Fix “A Required Privilege Is Not Held by the Client”?
Try these quick and straightforward techniques to get rid of the error. However, remember that some system files need to remain in that location to function. So, before making any changes, ensure the files aren’t drive-specific.
Before trying any of the following methods, try disabling or removing the antivirus. If it doesn’t work, then:
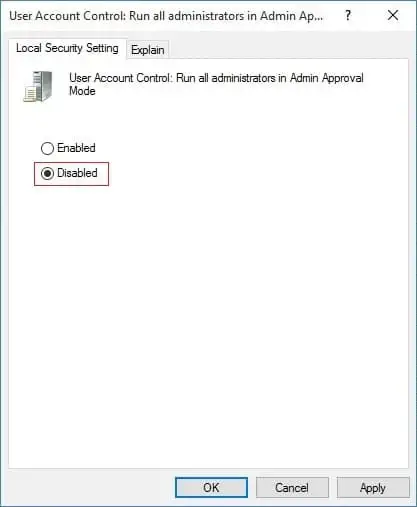
Method 1 – Disable Administrator Approval Mode
This is one of the easiest methods to solve the “a required privilege is not held by the client windows 10” error by disabling administrator approval mode. But remember that this works only for the latest Windows OS – 10 and 11 – and not Home Edition Windows.
Here’s how you can disable it:
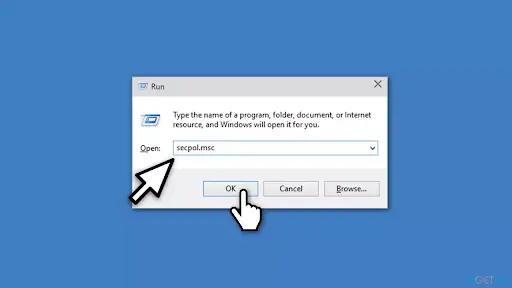
- Press Win+R together to open the command prompt.
- In the text box, type secpol.msc command.

- Press Enter. Click Yes if prompted.
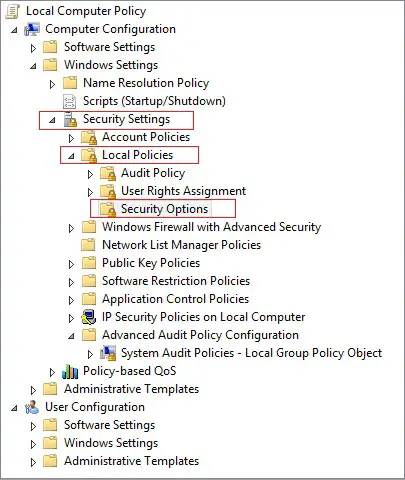
- From the Local Security Policy window that opens up, navigate to Security Settings – Local Policies and Security Options.
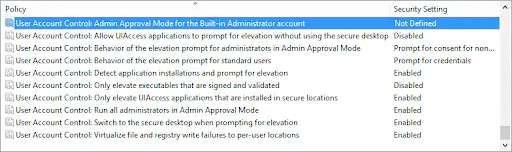
- From the right side panel, find User Account Control: Run all administrators in Admin Approval Mode.
- Right-click or double-click on it to open Properties.
- Select Disable.
- Press OK and then Apply.
- Close the Local Security Policy window and restart the computer. Now try opening or editing the file in the C: drive.
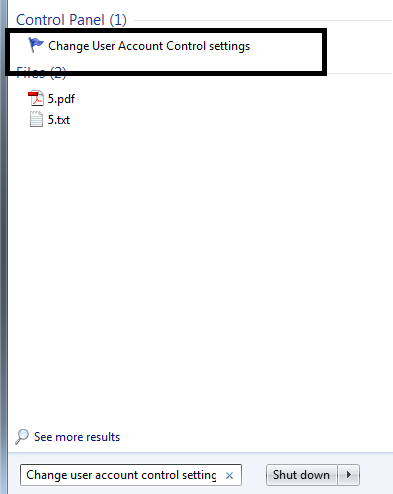
Method 2 – Disabling User Account Control
User account control allows the users to carry out administrative tasks without having to switch to a user account with complete administrative control. While this feature is certainly advantageous, it can interfere with the system and cause error 0x80070522.
In such cases, it is best to disable user account control by:
- First, open the search menu by pressing Win+S together.
- Search for Change user account control settings in the box and click on the first result.
- It’ll open User Account Control Settings.
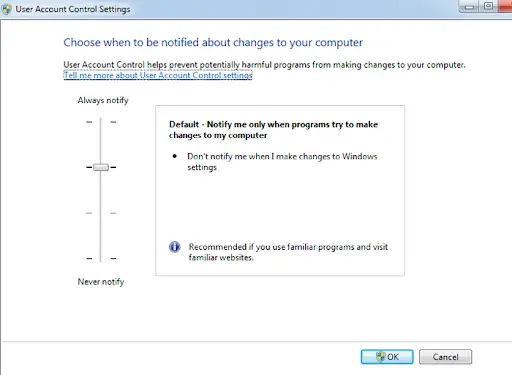
- From the slider that appears, drag it to the bottom at Never notify. It will help disable any notification appearing while you make the changes.
- Press OK to save the changes. The changes should apply and reflect in your system – it’ll eradicate the error.
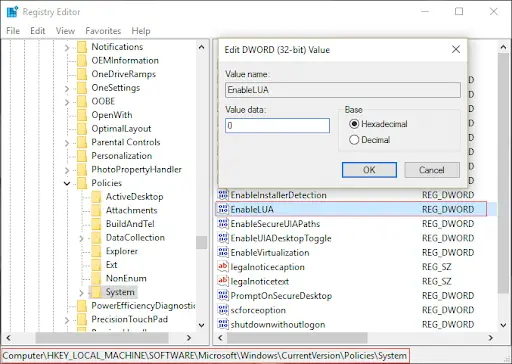
Method 3 – Disable UAC Using Registry Editor
You can also try disabling the UAC or User Account Control by using the registry editor. But before you do so, remember that the registry editor is an integral part of the system. Committing any mistakes while its manipulation can ruin the entire OS and render it unusable.
So, create a system checkpoint before starting the following steps.
- Press Win+R together to open the Run window. Type regedit, click OK, and then Yes if prompted. This will open Registry Editor.
- On the editor, find a key by navigating to HKEY_LOCAL_MACHINE\SOFTWARE\Microsoft\Windows\CurrentVersion\Policies\System.
- After clicking on the System key, find EnableLUA, a DWORD (REG_DWORD) registry. The registry should have its Data as Value(1).
- Now, right-click on it to open an editing window called the Edit DWORD Value box.
- Set the Value Data as 0 and press OK.
- Close all the windows and restart the window. Check if the issue has been resolved yet.
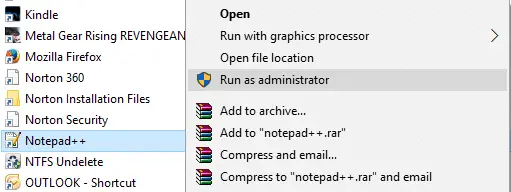
Method 4 – Run the Program as an Administrator
Since the C: drive holds files pertaining to the operating system, you’ll require administrative permission to open, create or modify the files.
For instance, if you wish to create a file using Notepad, simply right-click on it and choose Run as Administrator. Once you’re done with the task, save the file in the root folder. It’ll be saved successfully without any hitch.
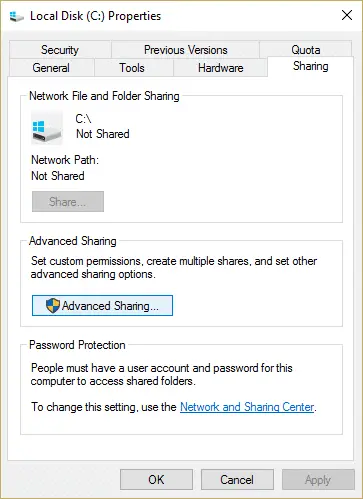
Method 5 – Change Sharing Permission
Changing sharing permissions is also a clever method of getting rid of the “a required privilege is not held by the client windows 10” error. Here’s how you can implement it:
- Go to the MyPC of your computer and find Local Disk C:/ (Windows installation drive).
- Right-click on it and select Properties.
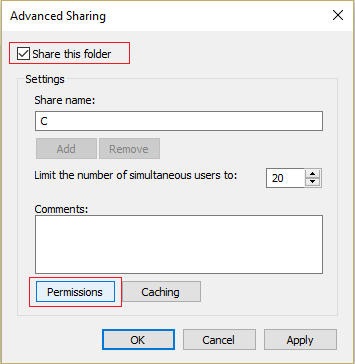
- From the list of options at the top select Sharing tab and then the Advanced Sharing button.
- From the new window, select Share this folder and click on Permissions.
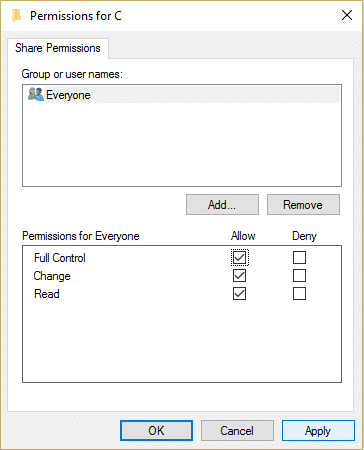
- Select Everyone from Group or user names.
- From Permissions for Everyone, check the box against Full Control.
- Complete the process by clicking Apply and then OK against every window that has been opened so far.
- Reboot Windows Explorer.
Method 6 – Take Ownership of the Root Drive
Remember how you took administrative permission for each file in a method? What if you want to take complete control over the drive? Then, here’s how you can do it:
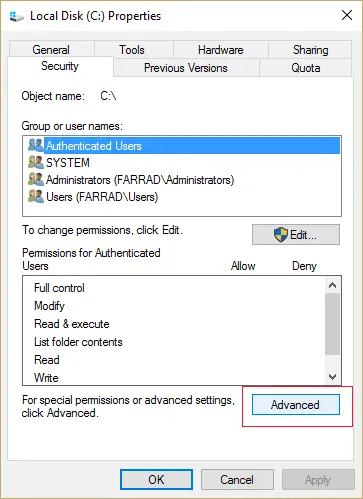
- Open File Explorer and go to MyPC. Find C: drive, right-click on it, and choose Properties.
- Navigate to the Security tab from the options from the top and select Advanced.
- Under the window, choose Change Permissions present on the bottom.
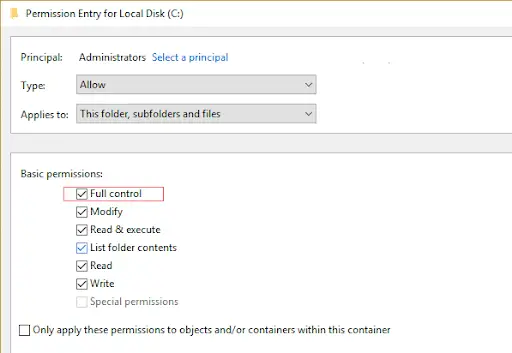
- Select Administrators account from Principal and choose Edit.
- Check the box against Full control. Click OK. It’ll redirect you back to the previous window.
- Select Administrators again.
- Check the box “Replace all existing inheritable permissions on all descendants with inheritable permissions from this object.”
- When prompted, click OK. Choose Apply and then OK again..Restart the PC to ensure the changes apply, and the error is removed.

Note – This method could cause some issues with the Windows Installation. So be sure to create a system restore point to create a backup for your data.
Method 7 – Change Account Type to Admin
The user account you’re using currently might not have the same security clearance as the one with administrative rights. So if you want to bypass the “a required privilege is not held by the client” error, then simply change your account type.
To make the change:
- Press Win+S together to open the search mode.
- On the typing box present in the Search pop-up, type User accounts.
- Select Change your account type.
- From the list of options that appear, select the Administrator option.
- Click Change account type.
Method 8 – Copy the Files Using Command Prompt
If you want a particular file to be copied to the drive, you can use the command prompt. The steps for it are:
- First, open the Command Prompt. You can do so by pressing Win+R together to open the Run utility or searching it manually from the start button.
- On the prompt, type the command copy E:\troubleshooter.txt C:\. You’ll have to replace E:\troubleshooter.txt with the path of the file you want to copy.
- After completing the process, the files will automatically get copied to the new location without showing the error.
Conclusion
These were all the methods to solve the “a required privilege is not held by the client” error. They will allow you to modify, create, and copy files from the C drive. Just remember that you’ll be manipulating files from a drive that controls the entire operating system. So, be careful and keep a backup before attempting any method.
