Cdpusersvc failed to read description can appear if have upgraded into Windows 10 Anniversary Update. The error related to this is shown as: Failed to Read Description – Error Code 15100. The service can be seen commonly in Task Manager. There are different scenarios why the error is present and in our today’s article we are going to cover them.
What is cdpusersvc failed to read description ?
The CDPUserSvc service is a sub-component of the Connected Device Platform service and will only be used from windows operating system in scenarios where the user connects a printer, scanner, or other types of external device. There are different scenarios when you may encounter this error:
- CDpusersvc service has stopped working, crash
- The CDpusersvc process might look like malware or virus
- CDpusersvc service failed to read
- Too much usage of your resources by CDpusersvc service may cause high CPU

What are some of the reasons behind cdpusersvc failed to read description – Error code 15100?
- Outdated Windows Operating SystemOS – Microsoft has already released a windows update hotfix in order to fix this problem on Windows 7, Windows 8.1, and Windows 10.
- Corrupted CDpusersvc service – System file corruption can also be responsible for the presence of this error code 15100.
- CDpusersvc service is not isolated – In case this problem persist because the CDpusersvc process does NOT function as a standalone service.
- Conflicting errant service –CDpusersvc service is containing a suffix that conflicts every time you make changes you enforce on the Windows Registry.
- Permission issue with Microsoft Store – You may have previously disabled it using GPO or Group Policy and in this way it’s very common that this can cause a conflict that will bring up the Cdpusersvc failed to read description pop-up error.
Method 1 – Install Windows Latest Updates
The KB released from Microsoft in order to fix cdpusersvc failed to read description – Error Code 15100 is KB4048952. In order to apply this hot fix you need to install every pending update until you bring your computer operating system build up to date. This method is applicable to both Windows 10 and older Windows versions. Below you can find the instructions how to do it:
- Open up a Run dialog box by pressing Windows key + R.
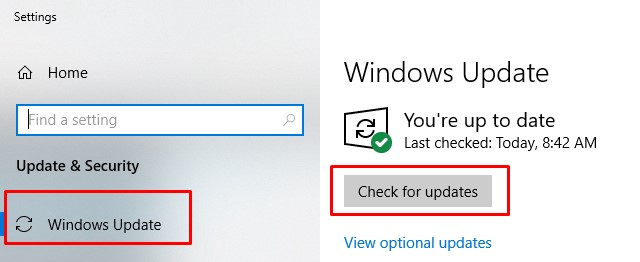
- Type ‘ms-settings:windowsupdate’
- Press Enter to open up the Windows Update tab of the Settings app.
- Once you’re inside the Windows Update screen, click on Check for Updates.
- Follow the on-screen pop-up wizard to install every Windows update that is currently waiting to be installed.
- Once every pending update is installed, restart your computer and see if the problem is resolved.
Failed to Read Description – Error Code 15100
Method 2 – Scan for virus and Malware
If you’re using windows defender, you should run it to see if there is virus or malware on your Pc. If you’re also using another software program, you should run a scan to see if there are affected files on your PC. After running the scan, you should restart your PC and see if you have removed Failed to Read Description – Error Code 15100 from CDPUserSvc Service.
Method 3 – Isolating the Process
This method is quick and easy but it will not fix the root cause of the error. Using this method you will be able to isolate cdpusersvc process using command prompt. In this way Windows will be forced to isolate the service in its own separate process. If you want to try just follow the instructions below:
- Press Windows key + R to open up a Run dialog box.
- Type ‘cmd‘ inside the text box and press Ctrl + Shift + Enter to open up an elevated CMD prompt.
- Once you have opened CMD prompt as an administrator with elevated privilege type the following command and press Enter to isolate the cdpusersvc process:
sc config cdpusersvc type=own
- After you run the command successfully, close CMD prompt
- Repeat the action that was previously triggering the error.
- Check if the problem is resolved.
Method 4 – Disable CDpusersvc in Windows 10
If you are not using a device such as printer, scanner, or other types of external device which are using the CDpusersvc service you can also disable it. This can be done using Windows Registry Editor.
Important Note:
- We do not recommend using this method in case yor are using and have connected printers, scanners or Bluetooth devices. This can cause to malfunction of your devices.
- Before starting we do strongly recommend to do a backup of windows registry key. Here how you can do it manually:
- From the Start menu, type regedit.exe in the search box, and then press Enter.
- If you are prompted for an administrator password or for confirmation, type the password or provide confirmation.
- In Registry Editor, locate and click the registry key or subkey that you want to back up.
- Click File > Export.
- In the Export Registry File dialog box, select the location to which you want to save the backup copy, and then type a name for the backup file in the File name field.
- Click Save.
In order to fix cdpusersvc failed to read description via Registry Editor follow the instructions below:
- Press Windows key + R.
- Type ‘regedit’ inside the text box.
- Hit Enter to open up Registry Editor. When you see the UAC (User Account Control) prompt, click Yes to grant admin access.
- Once you’re inside the Registry Editor, use the left-hand section to navigate to the following location:
Computer\HKEY_LOCAL_MACHINE\SYSTEM\CurrentControlSet\Services\CDPUserSvc
- After you land into the correct location, move over to the right-hand section and double-click on the Start value.
- Inside the Edit screen of Start, set the Base to Hexadecimal and set the Value data to 4 (Disabled) before clicking on Ok.
- Close the Registry Editor.
- Restart your computer.
- Return to the Properties screen of the CDpusersvc service and see if the problem is now fixed.
Method 5 – Run the SFC Tool
If running the Blue Screen Troubleshooter cannot solve the issue, then you can run the SFC tool to scan your system and repair detected issues.
Step 1: Open System File Checker
- Type Command Prompt in the search bar of Windows 10.
- Select the best-matched one and choose Run as administrator.
Step 2: Type the command
- In the pop-up window, type the command sfc /scannow and hit Enter to continue.
- Please do not close the window until you see the message Verification 100% complete
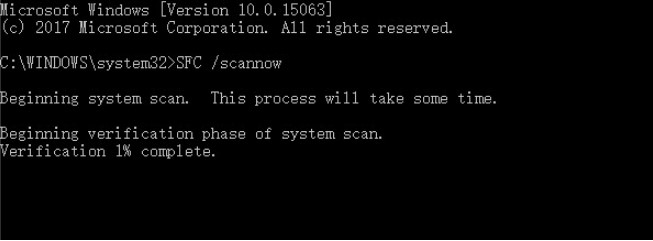
SFC scan now command
Step 3: Reboot your computer to check if the error persists.
Method 6 – Run the DISM Tool
In case when the error is still present you can try to run the DISM tool
The DISM tool (Deployment Image Servicing and Management) also perform an in-depth search on your PC, errors that couldn’t be detected by the SFC scan can be detected with DISM.
- Run Command Prompt by following the steps above for the SFC scan.
- You now type this command when Command Prompt open: exe /online /cleanup-image /restorehealth
- Hit enter to run the command, it will now scan for problems on your PC and fix them automatically.
- Restart your pc and after the scan is finished, then check to see if the error is gone.
Method 7 – Using a .bat file to stop the service
Using this method you will be able to create by yourself a .bat script which will be configured to run at every system startup. The idea behind the script is to search CDpusersvc service and to stop it automatically.
Step 1: Create the batch script
- Press Windows key + R to open up a Run dialog box.
- Type ‘notepad.exe’ inside the text box
- Press Ctrl + Shift + Enter to open up an elevated Notepad
- Inside the opened Notepad window, paste the following code:
@ECHO OFF
SC QUERY state= all>servicesdump.txt
FINDSTR /L /C:"SERVICE_NAME: CDPUserSvc_" servicesdump.txt >CDPservice.txt
FOR /F "usebackq tokens=2" %%i IN (CDPservice.txt) DO SET CDPUserSvc=%%i
NET Stop "%CDPUserSvc%"
SC Delete "%CDPUserSvc%"
DEL CDPservice.txt
DEL servicesdump.txt
- Click on File(from the ribbon at the top) and click on Save As…
- Name the script something recognizable
- Place it in a location that’s easily accessible and ensure that you change the extension to .bat before clicking on
Step 2: Configure the batch script to run at every system startup.
In order to do this we have already publish two article explaining in details every step. You can easily find them on the following links: Create Windows Task Scheduler and schedule to run bat file and How to create scheduled task with windows task scheduler. Make sure to configure the Task Schedule to begin At Startup. And ensure that the checkbox associated with Enabled (at the bottom) is checked.
Method 8 – cdpusersvc failed to read description run Startup Repair
This is the last method that will give the opportunity to your computer to boot into Windows without any errors. You need to create a Windows bootable USB or DVD drive before proceeding and try the startup repair. Follow the steps below:
- Access the official Microsoft website to create a bootable device for Windows 10.
- Insert the bootable USB or DVD and then boot Windows from there.
- You’ll see a Windows Setup window where you can select the language to install, the time and currency format, and the keyboard or input method.
- Next, click on Repair Your Computer.
- Select Troubleshoot.
- Click on the Advanced Options.
- Select Automatic Repair.
- Select the Operating System.
- When you’ve completed these steps, restart your PC by following the prompt window that appears.
Conclusions about cdpusersvc failed to read description
Dear followers of Get IT Solutions, in our step-by-step tutorial, we have provided all the possible solutions on how to fix Failed to Read Description – Error Code 15100. We hope you will find this method helpful. Have you managed to solve it? Please let us know in the comments below.

