There are a lot of things that we can do with our computers if only we know how to do them. When we buy a computer, there are many things clocked beforehand. But, with some basic changes, you can increase the efficiency of your device. In fact, you can do a lot as you enable and disable hardware acceleration.
Hardware acceleration means using your computer’s hardware for performing certain tasks, like rending videos or texts. It merely increases the speed of the process that it would be with the software only. This article will talk more about hardware acceleration and how to enable and disable hardware acceleration on your device.
If you are ready, let’s get started!
What Is Hardware Acceleration? Understanding it
So, what is hardware acceleration? As said earlier, hardware acceleration is a process that accelerates the performance of your system by using hardware instead of only software. Hardware acceleration helps in the smooth rendering of graphics. Hence, at times, you will find it loosely named graphic acceleration as well.
Let us now understand how hardware acceleration works. As many of you would know, when you give your computer a task, it first goes to the processor and then to the hardware. This hardware is mainly the sound or graphic card. Your processor receives information sequentially. So, the instructions are executed one by one. Therefore, it may take longer to get it done.
How to Enable Hardware Acceleration on Windows 11 10
What Does Hardware Acceleration Do?
So, what does hardware acceleration do? In short, hardware acceleration increases the speed of your computer in doing specific operations. And how does it do it? Well, hardware acceleration is a process through which your computer offloads certain tasks to specialized hardware.
For example, suppose you are using Photoshop on your laptop. Photoshop is one of the most graphic-intensive tools. Hence, it puts a lot of pressure on your CPU. Whenever we talk about any graphics-intensive work, the first thing that comes to our mind is a graphic card.
Now, when you use such an application on your computer, your computer will first throw it to the software before sending it to the hardware. With some modification, you can change the process and send the task directly to the respective hardware.
The bottom line is that it moves all graphic and text rendering from the CPU to the GPU, which increases the speed of your system, as well as the efficiency. So, when the GPU takes over, the VRAM processes the work in batches. It is more efficient than the CPU processing the tasks one by one.
That is why, with an efficient GPU, you don’t see any latency on your computer while processing such graphics-intensive work.
When to Use Hardware Acceleration
The main objective of using hardware acceleration is to improve application processing through hardware. Hence, there are a lot of scopes where you can use hardware acceleration to enhance the performance. For example, you can use hardware acceleration for the following purposes:
- Graphic-intensive works using GPU or graphics processing unit
- A Digital Signal processor helps in better digital signal processing.
- Sound processing using the sound card
- AI accelerator for Artificial Intelligence
- Various computing tasks using FGPA (Field-Programmable Gate Arrays), SoC (Systems-on-Chip), ASICs (Application-Specific Integrated Circuits)
If you have a top-notch GPU, you will be able to use the GPU to its full potential by enabling hardware acceleration. You can play all graphics-intensive games and movies and run Photoshop and other things smoothly on your device.
You might have noticed how Google Chrome puts so much pressure when running media or multiple tabs. Using hardware acceleration in Google Chrome, you will be able to consume as much as possible most smoothly. However, if you see crashing or freezing, you may have to disable hardware acceleration for Google chrome right away.
Suppose you are live-streaming your content on YouTube or Twitch or rendering videos on software like Adobe Premiere Pro. In that case, enabling hardware acceleration will help offload these tasks from the CPU and forward it to more specialized hardware (GPU in this case), which eases the process.
And this is not the end. You can do a lot of other stuff using hardware acceleration. So, if you have a powerful GPU, enabling hardware acceleration will always provide you with a butter-smooth experience and improve the overall function of your device.
Hardware Acceleration vs. Software Acceleration
The basic difference between software acceleration and hardware acceleration is that the former is suitable for some special-purpose applications. In contrast, the latter improves the overall performance, especially for graphically-intensive tasks.
Does My Computer Support Hardware Acceleration?
You might be wondering if your computer supports hardware acceleration. Hardware acceleration enables your device to use special-purpose hardware to process tasks that would have been otherwise slow with a general-purpose CPU.
To know whether your computer supports hardware acceleration, you first have to check what chips you have in your system and what hardware acceleration they support.
Once you know that it supports hardware acceleration, you should ensure that the system software knows how to put the hardware to its full use. At present, computers with an Intel CPU or some Nvidia graphics card support hardware acceleration.
Does Hardware Acceleration Use More Battery?
A lot of people’s concern is always regarding the battery life of their device. Does hardware acceleration cause more battery drainage? The shortest answer would be a no! Hardware acceleration does not drain more battery. Rather, it saves your battery life in the long run.
The reason is quite simple. When you enable hardware acceleration on your device, it offloads many intensive tasks from the CPU to GPU or any other efficient hardware. Hence, the computer can do the work more efficiently without being overwhelmed. It increases work efficiency and reduces load, resulting in better battery life.
How to Turn on Hardware Acceleration on Windows 10
So, how do you enable hardware acceleration on Windows 10? Enabling hardware acceleration on Windows 10 is rather simple. You just need to make a few changes quickly. Follow these steps below:
- Go to your desktop and right-click on it.
- Go down the menu and click on Display Settings.
- Once the Settings window opens, scroll down and click on Graphics Settings.
- If hardware-accelerated GPU scheduling is available for your device, you will find an option here. Turn it on.
- You need to restart your computer for it to work.
- Voila! Hardware acceleration Windows 10 is now enabled!
But what if you don’t find the hardware-accelerated GPU schedule here? Don’t worry. In that case, you can turn on hardware acceleration on Windows 10 by following these steps:
- Come back to the Display settings
- Scroll down and click on “Advanced Display Settings.”
- Click on “Display Adapter Properties for Display,” and a new window should open.
- If your computer supports hardware acceleration, you will find a “troubleshoot” tab. Its absence means your computer doesn’t support hardware acceleration.
- Click on Troubleshoot and then on “change settings.”
- A new window should open where you will see a slide. Change the slide from “None” to “Full.”
- Restart your computer.
- Finally, it’s all done and dusted!
How to Turn on Hardware Acceleration on Windows 11
It is easy to turn on hardware acceleration on Windows 11. The process is pretty much the same as Windows 10. Follow these steps below to enable hardware acceleration on Windows 11.
- Turn on your device and right-click on the display.
- Now click on “Display Settings.”
- The display settings window in Settings should open.
- Now, scroll down a little bit, and you will find “”
- Click on Graphics. If Hardware acceleration is supported on your device, you should find an option “change default graphics settings.”
- Click on it, and you should find the option to enable Hardware-accelerated GPU scheduling.
- Now, you have to restart your computer for it to have any effect.
Or, you can follow the alternative method as well.
- Come back to the display setting window and click on “Advanced Display setting.”
- Click on “Display Adapter Properties for Display,” and a new window should open.
- If the “troubleshoot” tab is available, click on it and click on “change settings.”
- Toggle the bar to “Full.”
- Restart your computer, and the hardware acceleration should be enabled on Windows 11 on your device.
How to Turn on Hardware Acceleration on Windows 7
Hardware acceleration is more popular in older versions of Windows, such as Windows 7, 8, or Vista. Hence, if you have the required hardware in your computer, you can quickly turn on hardware acceleration by following these steps below:
- Right-click on the desktop and select
- Now, select Display on the left side and then click on Change display settings.
- There should be an option named “Advanced,” which should directly open the Troubleshoot tab on your desktop.
- Click on “change settings.”
Now you will be able to see a bar with a None to Full slider. It should be set to “Full” by default. As you slide it left to None, you will disable the hardware acceleration. So,
- Slide the bar to “Full.”
- Restart your computer, and the hardware acceleration should be enabled on Windows 7 and 8 on your device.
How to Turn on or off Hardware Accelerated GPU Scheduling
We have discussed how to turn on hardware acceleration on different Window settings. Now, let us talk about how to turn off or disable hardware acceleration on the same.
How to Disable Hardware Acceleration on Windows 10 & 11
To turn off hardware acceleration on Windows 10 and 11, you need to go back to the same menu and access Graphic settings.
Settings > System > Display > (or, right click on desktop > Display>) Graphics Settings > and click on “Change Default Graphics Settings.”
Then, toggle off the “Hardware-Accelerated GPU Scheduling” switch and select Yes from the User Access Control prompt.
How to Disable Hardware Acceleration on Windows 7
To disable GPU hardware acceleration on Windows 7, follow these steps below:
Right-click on desktop > Personalization > Display > Change display settings > Advanced > change settings > Slide the bar to “None.”
What is Hardware Accelerated GPU Scheduling and the difference with Hardware Acceleration?
The primary difference between “Hardware Accelerated GPU Scheduling” and “Hardware Acceleration” is that the latter is a broader term. When we talk about hardware acceleration, we primarily mean GPU. However, hardware acceleration should incorporate any hardware that can offload tasks from the CPU.
For example, you can do sound processing using the sound card. The sound card is hardware in this case.
But, Hardware Accelerated GPU Scheduling means using GPU for more specific tasks, mainly to increase the efficiency of the computer, bypassing tasks to a dedicated GPU-based scheduling processor that you have in your system.
It mainly increases the framerate, thus reducing the latency. In this case, the GPU processes the task, whereas the primary job of the CPU is to manage it and send it in batches to the GPU.
Turn On or Off Hardware Accelerated GPU Scheduling in Settings
If you want to turn on or off hardware-accelerated GPU scheduling from the settings, you need to follow these steps:
- Open Settings
- Go to Display
- Scroll down, find and click on Graphics Settings.
- If hardware-accelerated GPU scheduling is available for your device, you will find a switch down the Hardware-Accelerated GPU Scheduling. Turn it on.
- Restart your computer, and the Hardware-Accelerated GPU scheduling should be working.
Now, if you want to turn off Hardware-accelerated GPU scheduling, you need to revisit the same page and turn the toggle off.
Or,
Settings > System > Display > (or, right click on desktop > Display>) Graphics Settings > and click on “Change Default Graphics Settings.”
Enable Hardware Accelerated GPU Scheduling using Registry
Warning: Before changing anything, you should know that Windows Registry can cause many severe issues if you modify it and fail to use it properly. Hence, ensure you have a complete backup of your system before implying any changes to your device through Windows Registry.
You can enable Hardware Accelerated GPU Scheduling using Registry. To do that, follow these steps below:
- Open the start menu
- Search for
- Click on the top result to open the Registry Editor on your device.
- You need to browse the following path:
HKEY_LOCAL_MACHINE/SYSTEM/CurrentControlSet/Control/GraphicsDrivers
- You should find the graphic drivers on the window. Right-click on it.
- Select the New submenu and click on the DWORD (32-bit) value.
- Rename the key HwSchMode and then press
- You can see the renamed key. Double-click on the key, and it should open a new window where you can set the value.
- Change it from to
- Click on OK
- Finally, restart your computer for it to work.
How to Turn on Hardware Acceleration on Third-party App
How to Turn on Hardware Acceleration in Chrome?
Enabling hardware acceleration on Chrome will enhance your browsing experience. Here is how you can enable hardware acceleration on Chrome:
- Click on the three-dot menu of Chrome that you can see in the right-left corner.
- Open Settings.
- Now scroll down to the bottom of the window and click on Show Advanced Settings.
- Find the System section below here.
- Now, select “Use hardware acceleration when available.”
- Restart Chrome to activate hardware acceleration on Chrome.
If you find your efforts unworthy, you can simply reset the settings, and things will be back to normal.
How to Turn on Hardware Acceleration on Spotify?
We know the benefits of hardware acceleration and how it can enhance the performance of your system. Hardware acceleration in Spotify helps to improve and optimize the app’s performance. Hence, it delivers a better quality of music listening experience.
To enable your Spotify hardware acceleration, follow these steps below:
- Open Spotify
- Click on Settings.
- Scroll down a bit and select Show Advanced Settings.
- You will find a toggle for Enable hardware acceleration under Compatibility.
- Turn it on.
- Restart the application, and it will work!
Hardware Acceleration on Discord?
Discord is one of the most popular web VoIP platforms. It has more than 150 million monthly users. The platform lets you play games with your friends while chatting. Hence, if you feel like reaping the benefits of hardware acceleration, you can do so by changing a few settings as shown below:
- Open Discord
- Click on the Gear icon
or,
- Go to the User Settings and click on Voice & Video.
- You can find Hardware Acceleration on the right panel.
- Check whether it is enabled or disabled.
- Enable the toggle switch to enable Hardware acceleration on Discord. It should be green when hardware acceleration is enabled.
Similarly, if you want to turn it off,
- Click on the toggle, and it will become dark.
- Now, click on the OK
- Restart Discord, and it is done.
Hardware Acceleration on Streamlabs?
Streamlabs is one of the most popular live streaming software. In case you feel issues with using the software, you can enable hardware acceleration and let your GPU handle it.
To turn on Streamlab Hardware Acceleration, follow these steps below:
- Launch Streamlabs and go to “Settings.”
- Select “Advanced” from the left menu.
- You will find “Enable Browser Source Hardware Acceleration” under the Sources.
- If you want to turn it on, check it on.
- Finally, restart your Streamlabs, and you are done.
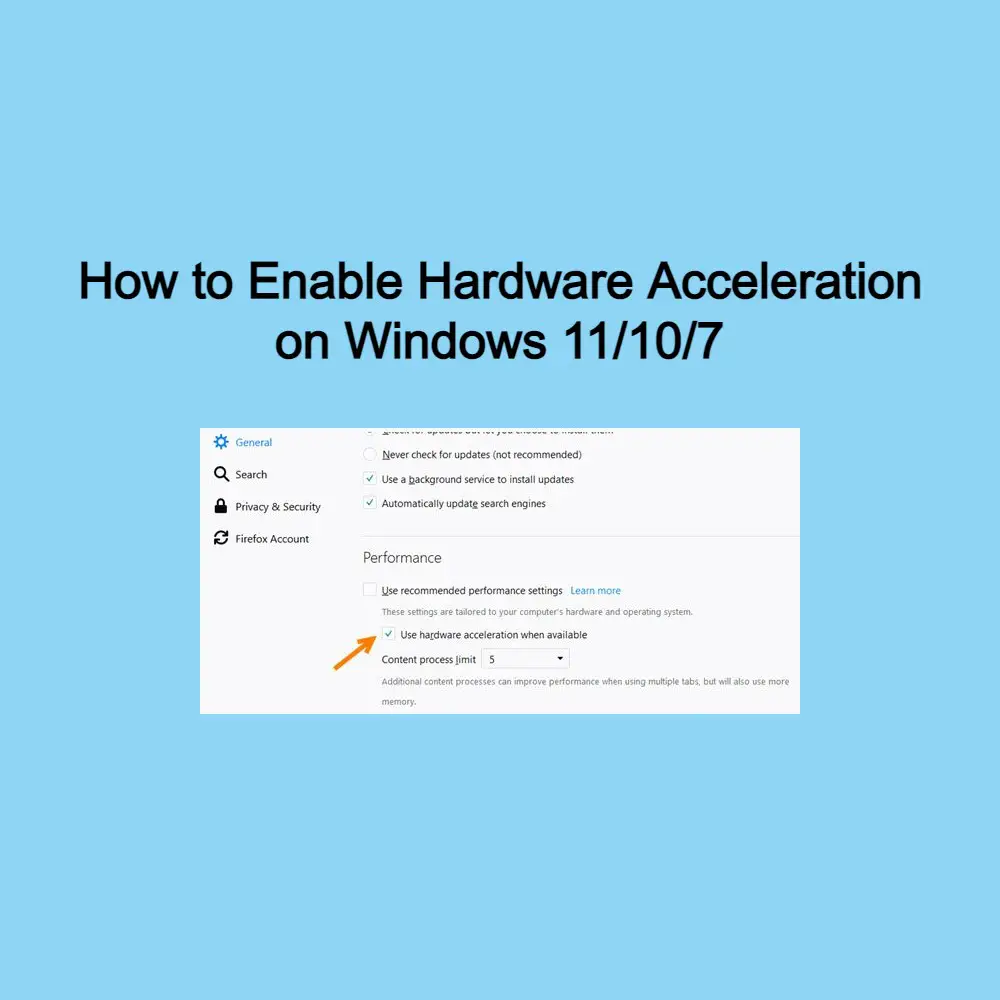
Hardware Acceleration on Firefox?
Enabling hardware acceleration on Firefox will enhance your browsing experience. However, if you find any issues after turning it on, turn it off. Here’s how you can do both:
- Open Firefox on your device.
- Click on three horizontal lines to open the menu.
- Head to the “Preferences.”
- Click on the “General.”
- Go to “Performance” and check (or uncheck if you want to turn it off) the “Use hardware acceleration when available” box to enable the feature.
- Close Firefox, and then restart it. And, you are done!
Conclusions:
After this detailed discussion, the one thing that we can clearly say is that hardware acceleration is manually modifying your device to act smarter. It is more like having an extra pair of hands to make work more efficient and quick. However, many computers may not support hardware acceleration.
Furthermore, if you see that your device is not giving great results or behaving unusually, you should turn it off. We hope that this article was a helpful guide for all your queries. That said, make sure you let us know if you face any other issues with your device!
Till then, goodbye!
